Becoming a Master of Sheet Sets: How to Assign AutoCAD Sheet Set Properties

Learning
Assign AutoCAD Sheet Set Properties

We’ve come to the point in our series where we’re moving beyond the basics and helping you to become a true AutoCAD sheet set manager. In this post, we’ll kick off with how to assign sheet set properties.

If you’ve been following the described workflow using your own project, you’ve been able to take advantage of sheet set functionality with minimal effort. However, if you want to fully implement sheet sets for maximum productivity, you will need to assign various sheet set properties.
You will find the sheet set properties by right-clicking on the sheet set title in the Sheet List tab of the Sheet Set Manager and selecting Properties.

Assign AutoCAD Sheet Set Properties

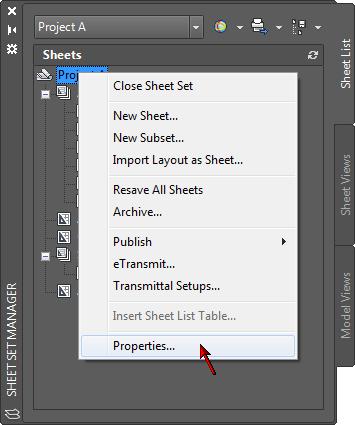
Note that you will also find a Properties option in the right-click menu for subsets and sheets.
Depending on which item you right-click, selecting Properties will display different dialog boxes (Sheet Set Properties, Subset Properties, Sheet Properties) enabling you to view and change the relevant properties for that particular item. In this section you’ll focus on the Sheet Set Properties.

Assign AutoCAD Sheet Set Properties

Assign AutoCAD Sheet Set Properties

Assign AutoCAD Sheet Sets

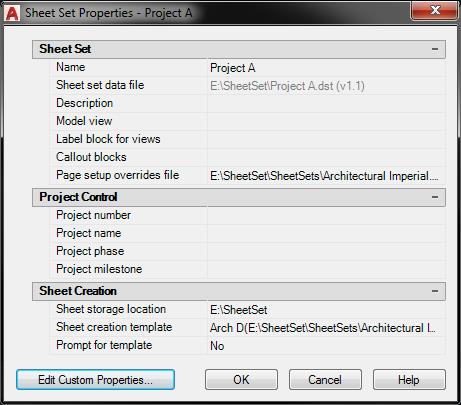
The Sheet Set Properties dialog includes three panels: Sheet Set, Project Control, and Creation. The Sheet Set section includes properties for the Name, Sheet set data file, Description, Model view, Label block for views, Callout blocks, and Page setup overrides files.

The Name property is for the name of the sheet set. It uses the name you provided when you created the sheet set with the Create Sheet Set Wizard (see Step 1: Creating a New Sheet). That name was also used for the name of the sheet set data file (DST) as you can see by viewing the Sheet set data file property. You can change the name of the sheet set using the Sheet Set Properties dialog box. However, the name of the sheet set data file will not change. If you want to change the name of the sheet set data file, you must close the sheet set in the Sheet Set Manager and then use Windows Explorer to rename the DST file. The Description property may be blank depending if you entered a description when you first created the sheet set. You can create or edit the description in the Sheet Set Properties if you wish.

What’s Next?

In the next post, you’re mastery of sheet sets progresses when we take a look at how to create custom properties. Remember, you can always catch up on the entire Mastering AutoCAD Sheet Sets series!

Try AutoCAD free for 15 days
The AutoCAD Blog is all about helping you get the most out of AutoCAD. It's also the best way for you to connect with the makers of AutoCAD. Subscribe to keep up with AutoCAD

______
icon-svg-close-thick

Cookie preferences

Your privacy is important to us and so is an optimal experience. To help us customize information and build applications, we collect data about your use of this site.

May we collect and use your data?

Learn more about the Third Party Services we use and our Privacy Statement.

Strictly necessary – required for our site to work and to provide services to you

These cookies allow us to record your preferences or login information, respond to your requests or fulfill items in your shopping cart.

Improve your experience – allows us to show you what is relevant to you

These cookies enable us to provide enhanced functionality and personalization. They may be set by us or by third party providers whose services we use to deliver information and experiences tailored to you. If you do not allow these cookies, some or all of these services may not be available for you.

Customize your advertising – permits us to offer targeted advertising to you

These cookies collect data about you based on your activities and interests in order to show you relevant ads and to track effectiveness. By collecting this data, the ads you see will be more tailored to your interests. If you do not allow these cookies, you will experience less targeted advertising.

icon-svg-close-thick

THIRD PARTY SERVICES

Learn more about the Third-Party Services we use in each category, and how we use the data we collect from you online.

icon-svg-hide-thick

icon-svg-show-thick

Strictly necessary – required for our site to work and to provide services to you

Qualtrics
W
Akamai mPulse
W
Digital River
W
Dynatrace
W
Khoros
W
Launch Darkly
W
New Relic
W
Salesforce Live Agent
W
Wistia
W
Tealium
W
Upsellit
W
CJ Affiliates
W
Commission Factory
W
Google Analytics (Strictly Necessary)
W
Typepad Stats
W
Geo Targetly
W
SpeedCurve
W
Qualified
#

icon-svg-hide-thick

icon-svg-show-thick

Improve your experience – allows us to show you what is relevant to you

Google Optimize
W
ClickTale
W
OneSignal
W
Optimizely
W
Amplitude
W
Snowplow
W
UserVoice
W
Clearbit
#
YouTube
#

icon-svg-hide-thick

icon-svg-show-thick

Customize your advertising – permits us to offer targeted advertising to you

Adobe Analytics
W
Google Analytics (Web Analytics)
W
AdWords
W
Marketo
W
Doubleclick
W
HubSpot
W
Twitter
W
Facebook
W
LinkedIn
W
Yahoo! Japan
W
Naver
W
Quantcast
W
Call Tracking
W
Wunderkind
W
ADC Media
W
AgrantSEM
W
Bidtellect
W
Bing
W
G2Crowd
W
NMPI Display
W
VK
W
Adobe Target
W
Google Analytics (Advertising)
W
Trendkite
W
Hotjar
W
6 Sense
W
Terminus
W
StackAdapt
W
The Trade Desk
W
RollWorks
W

Are you sure you want a less customized experience?

We can access your data only if you select "yes" for the categories on the previous screen. This lets us tailor our marketing so that it's more relevant for you. You can change your settings at any time by visiting our privacy statement

Your experience. Your choice.

We care about your privacy. The data we collect helps us understand how you use our products, what information you might be interested in, and what we can improve to make your engagement with Autodesk more rewarding.

May we collect and use your data to tailor your experience?

Explore the benefits of a customized experience by managing your privacy settings for this site or visit our Privacy Statement to learn more about your options.