Welcome to the fifth in a series of posts to lead you through the powerful Sheet Set functionality available in AutoCAD. In the previous post, I introduced you to some of the tools to help you organize your sheets. In this post, I step you through the process for creating a sheet list table in a drawing so that you can easily access relevant sheets directly from the title sheet.
The Sheet Set Manager (SSM) is a great way to organize your sheets and access them from a central location. But what if you want to include this sheet list as textual information in a drawing? Using the SSM, you can easily add a sheet list table to one of the sheets in the sheet set. You can even use the sheet list table to quickly open any of the sheets in the list.
1. Open a sheet in the AutoCAD window.
- Double-click on the sheet in which you want to add a sheet list table. Typically this would be a cover sheet or title sheet.
2. Insert a sheet list table.
- In the SSM, right-click on the sheet set title and choose Insert Sheet List Table.
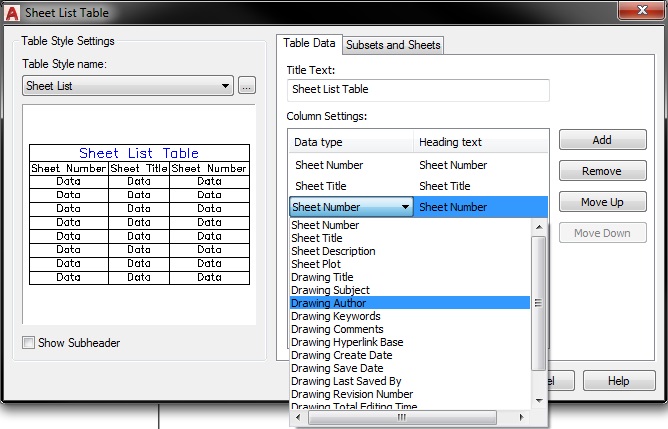
- In the Insert Sheet List Table dialog box, select a table style. If you don’t have an appropriate table style, you can create one. Creating and using table styles is similar to creating and using text or dimension styles. For example, create a table style called Sheet List, which uses the appropriate font size, color, etc. Then use that table style every time you need to create a sheet list. Using table styles will save you time and ensure consistency from project to project. Since table styles are saved in the drawing, add your desired table styles to your template drawing(s) so that you will always have them available.
- Specify the Table Data Settings that you want to include in the Sheet List Table. By default, Sheet Number and Sheet title are included in the list. You can select Add or Remove to change how many columns are included in the sheet list table and you can click on the items in the Data Types list to change their content. Use the Move Up and Move Down buttons to change the order in which the data will be displayed.
- Choose OK.
- Place the table on the sheet. The sheet list table is an AutoCAD table object that contains fields for the sheet set data such as sheet number and sheet name. Since this is a table object, you can use typical table editing commands to change its appearance. However, any edits you make will be lost the next time you update the sheet list. For this reason, you should not make any edits directly to the sheet list table. If you want to change its appearance, you should edit its table style and/or edit the sheet list table settings.
3. Edit the Sheet List Table settings. After you insert a sheet list table, you can edit its settings.
- Select the sheet list table in the drawing.
- Right-click and choose Edit Sheet List Table Settings.
- Change the table style, title, or column settings as necessary. Any changes that you make using this method will be retained even when you refresh the table data.
4. Change the contents of the sheet list in the SSM.
- Add, remove, rename, or renumber the sheets in the SSM. Notice that the data in the drawing’s sheet list table, does not change dynamically. You must force the table to update.
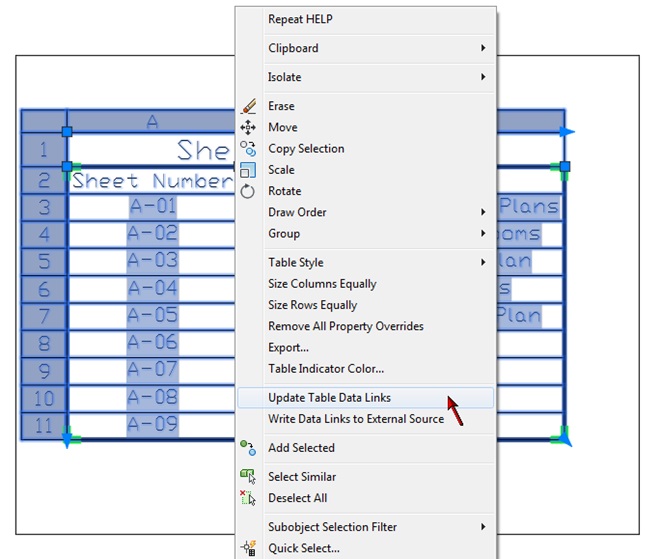
5. Update the sheet list table.
- Select the sheet list table in the drawing.
- Right-click and choose Update Sheet List Table. The sheet list table updates to reflect any changes to the sheet list in the SSM.
6. Access sheets from the sheet list table. You can easily open any of the drawing sheets from the sheet list table by pressing the CTRL key and picking on the sheet name or number.
With sheet list tables, you can begin to appreciate how the sheet names, numbers, and other data in the SSM can be used to create meaningful and automated textual data in your drawings.
What’s Next?
In a previous post, I described how to create a new sheet set from existing drawings, followed by organizing and accessing your sheets. However, unless your project was nearly complete when you created the sheet set, chances are that you’ll need to continue adding new sheets to your set as the project progresses. So, in the next post, I’ll show you how to do just that!
Remember, you can always catch up on the entire Mastering AutoCAD Sheet Sets series!