On your path to becoming a sheet set master, it’s important to explore how to create new sheets in AutoCAD. This installment of our series offers detailed, step-by-step instructions to do just that.
When you create a new drawing using traditional methods (i.e., the NEW command), you must use an existing drawing file as a template. The existing drawing could be a DWG (drawing), DWT (template), or DWS (standards) file. It might be one of the default AutoCAD drawing files or, more likely, your own customized drawing that contains layers, title block, and other information specific to your project or company. Up until now (assuming you are following this workflow) you have been creating new drawings using traditional methods and then importing the layouts into the Sheet Set Manager (SSM). To create new sheets more efficiently, you can set the sheet creation properties in the sheet set to use a template file and then create your new sheets directly from the SSM.
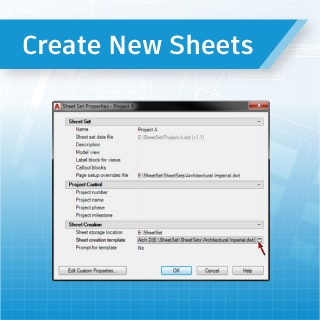
1. In the SSM, right-click on the sheet set title and choose Properties.
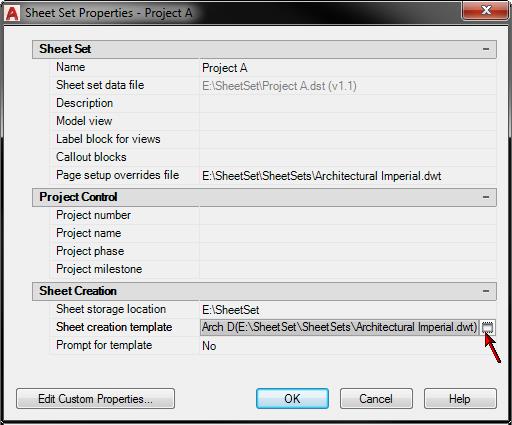
2. In the Sheet Set Properties dialog box, select the Sheet Creation Template and choose the button to access the Select Template dialog box. By default, the sheet creation template uses a template (DWT) file that is installed with AutoCAD. You want to change this property so that it uses your own template file.
3. In the Select Template dialog box, navigate to your template file and choose Open. The Select Layout as Sheet Template dialog box will display. It lists all of the layouts that are included in the template file.
4. Select a layout and choose OK. If you have multiple layouts, select the one that you use most frequently.

5. In the Sheet Set Properties dialog box, set the Prompt for Template property to Yes or No as appropriate. By default, this property is set to No. This means that every time you create a new sheet in the sheet set, AutoCAD will automatically use the template file which is assigned to the Sheet Creation Template property. If you always (or almost always) use the same template file, you should select No. If you frequently need different template files, you can set this property to Yes so that AutoCAD will prompt you to select a template file and layout each time you create a new sheet in the sheet set. You can also assign different sheet creation templates based on the subset in which you are creating the new sheet.
6. In the Sheet Set Properties dialog box, select the Sheet Storage Location and choose the button to access the Browse for Folder dialog box.
7. In the Browse for Folder dialog box, navigate to the folder where you want drawing files (DWG) for the new sheets to be created. The location you specify depends on the folder structure of your project. If you store all of your project drawings (sheets) in one folder, select that folder. If you organize your drawings in subfolders, you may want different sheet storage locations based on the subsets in your sheet set. As you move forward with sheet sets you might want to consider creating separate folders for “sheet” drawings versus “model” drawings. You’ll learn more about that later.
8. In the Sheet Set Properties dialog box, choose OK. A dialog box appears and reminds you that changes were made to the sheet set and asks if you want to apply your changes to all of the nested subsets. This relates back to my previous comments about the ability to specify different sheet creation templates and locations based on subsets.
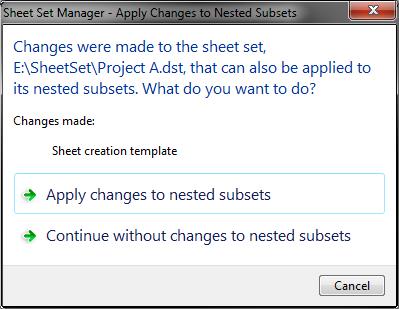
9. In this dialog box, specify if you want to apply the changes to all nested subsets. If you choose Apply changes to nested subsets, then the sheet creation properties will be consistent for the entire sheet set regardless of where you create the new sheet within the sheet list. If you choose Continue without changes to nested subsets, you may get different sheet creation behavior depending in which, if any, subset you create the new sheet.
10. In the SSM, right-click on the sheet set title and choose New Sheet.
11. In the New Sheet dialog box:
- Review the Folder Path and Sheet Template. They should match the location and template file that you specified in the sheet set properties.
- Enter a sheet number and title. As you enter the number and title, AutoCAD automatically enters them for the file name. You can name the file anything you want. It’s recommended that you remove number from the file name to avoid future confusion because if you renumber the sheets in the sheet set, the sheet number and the file name will be different. Your current practice might be to include the sheet number in the file name to help you identify the drawing in your project folder. However, with sheet sets, that “old” practice is unnecessary because the SSM enables you to manage sheet numbers and access the correct drawing files.

- Choose OK. AutoCAD automatically creates a new drawing and adds the sheet to the sheet list. Remember that the sheet in the sheet list is simply a link (shortcut) to a layout in the DWG file.
12. Double-click on the new sheet to verify that it used the correct template.
If you want to apply different sheet creation properties based on the subset, you can right-click on a subset and choose Properties to modify the new sheet location, template, and prompt option for that particular subset. Then, when you right-click on that subset and choose New Sheet, AutoCAD will create the new sheet within that using those particular sheet creation properties.
What’s Next?
As you move closer to complete sheet set mastery, we’ll next take a look at how to automate title block data. Remember, you can always catch up on the entire Mastering AutoCAD Sheet Sets series!