How to Use Frames in AutoCAD: Tuesday Tips With Frank

Learning
Frames in AutoCAD

Attaching raster image files as underlays has become quite common in modern CAD departments. In fact, I’ve seen entire sheets of a document set as nothing but attached underlays with the occasional leader or text block alongside them.

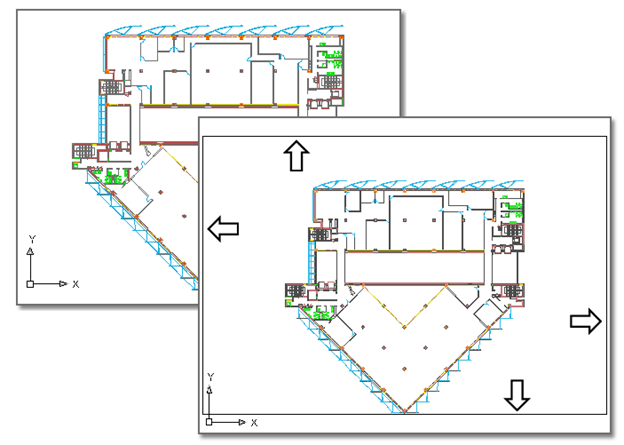
There’s an inherent issue with them though: their frames in AutoCAD. A frame is the visual border that shows the extents of the underlay (or its clipped boundary). You may want to see them. Or not. You may want to plot them. Or not. Those decisions may be different depending on what kind of file it is. Or not.

In practice, it can all be confusing, but it can get even more so if you don’t understand how these frames work. First, how does AutoCAD manage them?

AutoCAD underlay frame
The foreground example shows the underlay with a visible frame.

Various Frame Variables

Each underlay type has a corresponding AutoCAD System Variable (SysVar) that controls how the frame is managed. Below is a list of the various frame variables (there are a few others, but these deal specifically with underlays).

They all work the same way. They all have three possible values, but the default setting differs depending on type. Here is how they work:

0: The frame is not visible, and it is not plotted. The frame temporarily reappears during selection preview or object selection.

1: Displays and plots the frame.

2: Displays, but does not plot the frame.

I wish I could tell you there was a handy control for adjusting these in either the contextual Ribbon tab or the right-click popup menu, but there isn’t. You’ll have to resort to looking them up (because let’s be honest…you’re not going to remember them), typing them in, then going back to look up the values (see last point).

Master of the Frames in AutoCAD

This brings us to the final piece of the puzzle, and the one that creates the most confusion. There’s also a System Variable called FRAME. And to those that aren’t familiar with the individual frame variables, it seems like a logical place to start.

In fact, most of us first notice it in the Reference panel of the Ribbon’s Insert tab. It nicely displays graphics and descriptions of the three settings.

AutoCAD reference panel frames

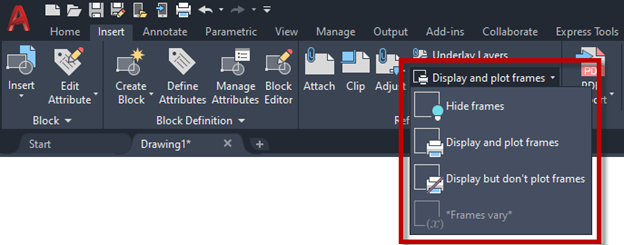
Sounds easy, right? But this is where the confusion comes in. Remember I said that the individual frame type settings differ by default? That’s why you probably have noticed this Ribbon tool displaying in its default state of *Frames vary.*

frames vary AutoCAD

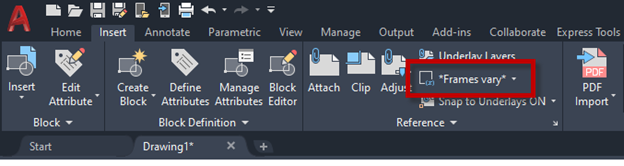
Here’s the kicker: This menu item controls the FRAME variable, and it in turn controls all the individual frame variables. In other words, changing FRAME sets all the others to that value.

Final Thoughts

No wonder this is a source of confusion and questions. Imagine a fairly normal scenario where your drawing has both a DWF and a JPG attached, which have different defaults for their respective Frame variable. You change FRAME via the Ribbon, and now both underlays work the same and may be different than what you intend.

To further the confusion, all these variables are stored in the drawing, so they may all be different from file to file—making things even worse!

If all this sounds like a good place for an enterprising CAD Manager to take over, you’re right. In fact, they don’t need a lot of experience with AutoLISP to make sure your settings are always right. If you’re one of those people, you might check out both Part 1 and Part 2 of our series on Automating your Tasks with AutoLISP.

(Spoiler Alert: Use setvar to set your sysvars in the acaddoc.lsp file. Badda-bing.)

More Tuesday Tips

Check out our whole Tuesday Tips series for ideas on how to make AutoCAD work for you. Do you have any favorite AutoCAD tips? Tell us in the comments!


Frank Mayfield

Frank has worked in various design and CAD Management roles with AutoCAD and Autodesk software since 1986 (v2.62). He is currently a Design Technology Consultant in Tulsa, OK. He also serves as Vice President on the AUGI Board of Directors and is a member of numerous Autodesk user panels. As a top-rated mentor for trial users of AutoCAD 2018 and AutoCAD LT 2018, he has provided live, real-time guidance and support for over 2,500 new users in more than 50 countries worldwide. He currently serves on the AUGI Board of Directors and is a member of numerous Autodesk user panels.

Try AutoCAD free for 15 days
The AutoCAD Blog is all about helping you get the most out of AutoCAD. It's also the best way for you to connect with the makers of AutoCAD. Subscribe to keep up with AutoCAD

______
icon-svg-close-thick

Cookie preferences

Your privacy is important to us and so is an optimal experience. To help us customize information and build applications, we collect data about your use of this site.

May we collect and use your data?

Learn more about the Third Party Services we use and our Privacy Statement.

Strictly necessary – required for our site to work and to provide services to you

These cookies allow us to record your preferences or login information, respond to your requests or fulfill items in your shopping cart.

Improve your experience – allows us to show you what is relevant to you

These cookies enable us to provide enhanced functionality and personalization. They may be set by us or by third party providers whose services we use to deliver information and experiences tailored to you. If you do not allow these cookies, some or all of these services may not be available for you.

Customize your advertising – permits us to offer targeted advertising to you

These cookies collect data about you based on your activities and interests in order to show you relevant ads and to track effectiveness. By collecting this data, the ads you see will be more tailored to your interests. If you do not allow these cookies, you will experience less targeted advertising.

icon-svg-close-thick

THIRD PARTY SERVICES

Learn more about the Third-Party Services we use in each category, and how we use the data we collect from you online.

icon-svg-hide-thick

icon-svg-show-thick

Strictly necessary – required for our site to work and to provide services to you

Qualtrics
W
Akamai mPulse
W
Digital River
W
Dynatrace
W
Khoros
W
Launch Darkly
W
New Relic
W
Salesforce Live Agent
W
Wistia
W
Tealium
W
Upsellit
W
CJ Affiliates
W
Commission Factory
W
Google Analytics (Strictly Necessary)
W
Typepad Stats
W
Geo Targetly
W
SpeedCurve
W
Qualified
#

icon-svg-hide-thick

icon-svg-show-thick

Improve your experience – allows us to show you what is relevant to you

Google Optimize
W
ClickTale
W
OneSignal
W
Optimizely
W
Amplitude
W
Snowplow
W
UserVoice
W
Clearbit
#
YouTube
#

icon-svg-hide-thick

icon-svg-show-thick

Customize your advertising – permits us to offer targeted advertising to you

Adobe Analytics
W
Google Analytics (Web Analytics)
W
AdWords
W
Marketo
W
Doubleclick
W
HubSpot
W
Twitter
W
Facebook
W
LinkedIn
W
Yahoo! Japan
W
Naver
W
Quantcast
W
Call Tracking
W
Wunderkind
W
ADC Media
W
AgrantSEM
W
Bidtellect
W
Bing
W
G2Crowd
W
NMPI Display
W
VK
W
Adobe Target
W
Google Analytics (Advertising)
W
Trendkite
W
Hotjar
W
6 Sense
W
Terminus
W
StackAdapt
W
The Trade Desk
W
RollWorks
W

Are you sure you want a less customized experience?

We can access your data only if you select "yes" for the categories on the previous screen. This lets us tailor our marketing so that it's more relevant for you. You can change your settings at any time by visiting our privacy statement

Your experience. Your choice.

We care about your privacy. The data we collect helps us understand how you use our products, what information you might be interested in, and what we can improve to make your engagement with Autodesk more rewarding.

May we collect and use your data to tailor your experience?

Explore the benefits of a customized experience by managing your privacy settings for this site or visit our Privacy Statement to learn more about your options.