
Fusion Team for the Inventor user
When working with Product Design & Manufacturing Collection, users have options for not only managing their data, but collaborating with stakeholders internal and external to the organization. This post will cover Fusion Team and its Data Management and Collaboration abilities with Autodesk Inventor.
First things first: how do you get access to Fusion Team. The answer(s) are all good news! 1) If you are a subscriber to PDMC (Product Design & Manufacturing Collection) you have access already 2) If you have a subscription to Fusion 360, you have access and 3) you can take advantage of Autodesk’s Extended Access Program and start using Fusion Team right away to manage and collaborate on designs. To check on the tools you have access to, log into your subscription account https://manage.autodesk.com/ and see which path to take. Keep in mind that this is a collaborative tool, so depending on your role, let your CAD or Vault manager/administrator set things up for you. If you are the CAD manager, read on…
Terminology
Let’s talk about some terminology. First, Hubs. A Fusion Team Hub is the ‘site’ or workplace for your designs. This is a centralized location where multiple people log in and upload/download, view, markup, and comment on files. There’s also a Wiki for capturing non-file information like team minutes or notes. A Hub has a security model and different roles as well to control access to data.

Hubs are designed to have multiple users at varying permission levels across the site. This ranges from Team Administrator (by default the Hub Owner is a Team Admin), Team Member, and Project Contributor. Typically, there are several Team Admins to watch over any administrative tasks like invites, archiving, etc. Team members would be expected to be others within your organization – though they could easily be customers, contractors, or consultants. Project Contributors are ideal for viewers of data, though they can be allowed to upload data if needed. In most cases these are those outside your organization acting in a Supply Chain or consumers.

Within the Hub, data is organized into Projects. These appear as top level folders within Fusion Team, but they are so much more. First, Projects have their own permissions to control access to the data within. These range from the Project Admin, to Editor, and a Viewer role. Project also have types: Open, Closed, and Secret. With an Open Project, other members can see the project and join. A Closed Project is the default type when creating a new Project, and while members can see them, they must request access to join. Finally, the Secret Project is unique in that only the person that created the Project can see it, though they can invite others into it.
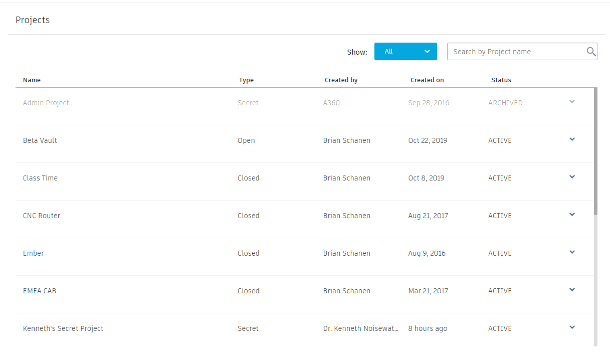
For the purposes of this post and when using Fusion Team for Inventor data, an Open project is ideal for collaboration within your engineering group. Note: Upon logging into a new Fusion Team Hub, you may notice some sample Projects. Those are there with sample files to give you a feel for how data is displayed – feel free to archive those away when you’re done. For more details on Fusion Team Administration , Projects, and Users, check out this video.
Getting Inventor Data into Fusion Team
Fusion Team can house and manage just about any file type. In fact, it can view a variety of formats beyond Autodesk types or even CAD. Since we’re talking Inventor (and maybe some AutoCAD) in this post, let’s chat about a nifty utility called Desktop Connector. To access Desktop Connector, once you log into Fusion Team click on your avatar and scroll to the bottom of the menu. Click Install Desktop Connector, follow the prompts for installation.

After Desktop Connector is installed, sign in with your Autodesk ID (note: use the SAME one used to access Fusion Team).

In Windows Explorer, you’ll notice some new drives appear. Fusion Team will appear as Fusion 360, and if you double click it you’ll see the Hubs you have access to. For example, in the images below, notice that I have Fusion, and also BIM 360 access. Click on the Hub again, and the Projects you have access to within Fusion Team display as folders. This is where the next and final step takes us: Loading data into Fusion Team via Desktop Connector.


Loading data into Fusion Team via Desktop Connector
Ok, the part you’ve likely been waiting for. This next step is straightforward – you will place your Inventor (or AutoCAD, etc) data into the folders or subfolders that Desktop Connector created. For initial setup, create an Inventor project file (.ipj) at the top level of the Fusion Team Project you are working in. Optionally, you can Pack and Go existing data/designs to the folders made by Desktop Connector as the .ipj comes along for the ride. You can also drag and drop other folders with CAD files into the new Fusion Team Project folders. Which ever method you use, give the Desktop Connector some time, and it will upload all the files, designs, and maintain file dependency in Fusion Team. Then jump over or log into Fusion Team and peruse the folders. Your Inventor Drawings, Assemblies, Parts, etc will be there, and you can see uses, where used, and view the files. Finally, be sure to just use the Fusion drive in Windows explorer to work. Provide the link to your team mates, co-workers, and where necessary, any other stakeholders outside your organization that you collaborate with.

Be sure to register for the webinar Solutions for Remote Collaboration in Design and Manufacturing where we will deep dive into Fusion Team and other ways to work remotely with Autodesk solutions.
Written by:
![]() Brian Schanen | PLM/PDM Readiness Program Manager | Autodesk, Inc.
Brian Schanen | PLM/PDM Readiness Program Manager | Autodesk, Inc.
Brian Schanen works for Autodesk, Inc., as a PLM/PDM Readiness Program Manager in the Business Strategy & Marketing division. He is responsible for global technical and sales enablement focused on PLM (Product Lifecycle Management) and PDM (Product Data Management) and the design, creation, implementation, and delivery of PLM/PDM based curriculum, technical and sales tools, live events, and assets. With 18 years of PDM and PLM experience, he is a seasoned speaker, presenting at events such as Autodesk University, One Team conferences and extensions. On any given day, you can find him coaching internal teams, prospects, mentoring new customers, and even assisting in deployments of Autodesk PLM/PDM software.


Fusion and local drives. As far as i understand after reading this article and inventor help the effective way is working on local drive and afterwards (once inventor is closed) move the files to fusion drive. Reversely if i recover a project from the cloud i should move the files with the export option from fusion drive to my local drive. Thanks in advance for some advice.
Autodesk desktop connector can be used to automatically back up your files to Fusion team - similarly to how DropBox or Onedrive work: https://knowledge.autodesk.com/support/desktop-connector/learn-explore/caas/CloudHelp/cloudhelp/ENU/CONNECT/files/Install-and-Update-Desktop/GUID-847CE3FC-B26F-46B8-895E-5D825F4BD540-html.html