Structural Precast for Revit – Configuration Settings

Tomasz Fudala Tomasz Fudala September 18, 2017

2 min read

A few weeks ago I published an overview video for Autodesk Structural Precast Extension for Revit and now I think it is the right time to get up to speed on the latest Precast tools in Revit.

With this post I would like to start a dedicated series on this new app to help you get started with the tools and to share with you some useful tips and tricks.

Autodesk Structural Precast Extension for Revit 2018 was released along with Revit 2018.1 release.

The extension must be download from the Autodesk App Store and then installed on the top of Revit 2018.1

…or you can also access the installer from within the Autodesk Desktop App:

At this moment, the extension is available in English, French and German languages.

Once installed, several Revit families and templates are placed in a dedicated location… C:\ProgramData\Autodesk\Structural Precast for Revit 2018\Families\en.

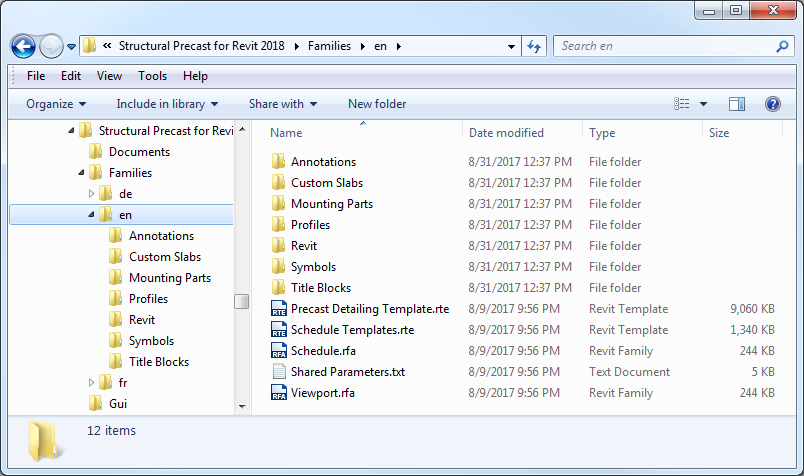
The installed files include:

Here is what the Precast tab looks like once the extension is installed.

You must be wondering what the On/Off button does, an answer is pretty straight forward as it enables or disables the extension. You can use this tool to turn the extension off to replenish hardware resources and improve Revit performance if there is such need.

When you attempt to run the first command, you are presented with the following warning:

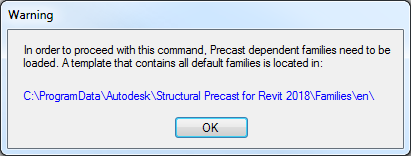
This is basically saying some content needs to be loaded for this extension to work properly.

That’s why it is a good practice to start working on a new project running the Configuration tool first.

Before you start using Structural Precast Extension for Revit you should configure these settings for walls, slabs and built in parts. The settings include position numbering, part information, segmentation rules, reinforcement definition, and project drawing defaults for walls and slabs, as well as settings for annotation and dimensioning in parts.

Once you open this dialog and click OK all necessary Revit families and templates will be loaded to the current project automatically and the warning message will not be bothering you anymore.

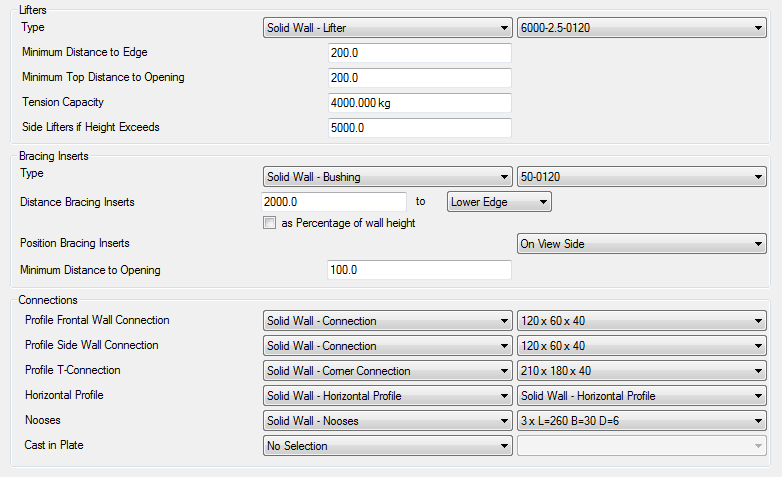
The Configuration dialog is organized in a tree view, each node contains options for precast concrete assemblies.

For example the wall node configures settings for solid structural walls. These settings include wall part information about lifters, bracings and connectors:

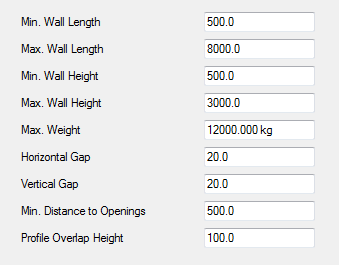
…segmentation rules:

…reinforcement definition:

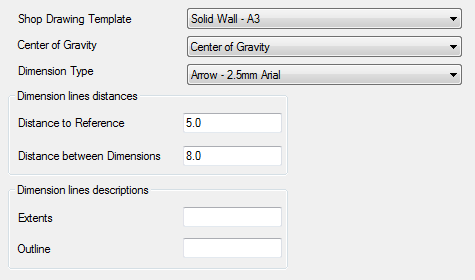
…and project shop drawing defaults:

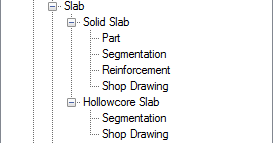
The similar groups of setting you can find for slabs (solid slabs and hollowcore slabs):

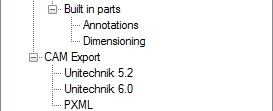
The Built in parts node configures settings for annotation and dimensioning in parts and the CAM Export node configures additional data specific to each CAM file type.

All these Precast settings are project related but you can maintain consistent configuration settings across similar projects by exporting them to an XML file which can later be imported into other projects. This gives you the ability to create different configurations for different manufacturers or sites.

To export/import your current configuration file just right click in the tree view and select Export/Import from the context menu.

In my next post of this series I will touch upon the topic of segmentation of walls.

For more posts on structural precast in Revit, check out these past articles on BIM and Beam:

@tomekf

Get AEC updates in your inbox

By clicking subscribe, I agree to receive the AEC newsletter and acknowledge the Autodesk Privacy Statement.

______
icon-svg-close-thick

Cookie preferences

Your privacy is important to us and so is an optimal experience. To help us customize information and build applications, we collect data about your use of this site.

May we collect and use your data?

Learn more about the Third Party Services we use and our Privacy Statement.

Strictly necessary – required for our site to work and to provide services to you

These cookies allow us to record your preferences or login information, respond to your requests or fulfill items in your shopping cart.

Improve your experience – allows us to show you what is relevant to you

These cookies enable us to provide enhanced functionality and personalization. They may be set by us or by third party providers whose services we use to deliver information and experiences tailored to you. If you do not allow these cookies, some or all of these services may not be available for you.

Customize your advertising – permits us to offer targeted advertising to you

These cookies collect data about you based on your activities and interests in order to show you relevant ads and to track effectiveness. By collecting this data, the ads you see will be more tailored to your interests. If you do not allow these cookies, you will experience less targeted advertising.

icon-svg-close-thick

THIRD PARTY SERVICES

Learn more about the Third-Party Services we use in each category, and how we use the data we collect from you online.

icon-svg-hide-thick

icon-svg-show-thick

Strictly necessary – required for our site to work and to provide services to you

Qualtrics
W
Akamai mPulse
W
Digital River
W
Dynatrace
W
Khoros
W
Launch Darkly
W
New Relic
W
Salesforce Live Agent
W
Wistia
W
Tealium
W
Upsellit
W
CJ Affiliates
W
Commission Factory
W
Google Analytics (Strictly Necessary)
W
Typepad Stats
W
Geo Targetly
W
SpeedCurve
W
Qualified
#

icon-svg-hide-thick

icon-svg-show-thick

Improve your experience – allows us to show you what is relevant to you

Google Optimize
W
ClickTale
W
OneSignal
W
Optimizely
W
Amplitude
W
Snowplow
W
UserVoice
W
Clearbit
#
YouTube
#

icon-svg-hide-thick

icon-svg-show-thick

Customize your advertising – permits us to offer targeted advertising to you

Adobe Analytics
W
Google Analytics (Web Analytics)
W
AdWords
W
Marketo
W
Doubleclick
W
HubSpot
W
Twitter
W
Facebook
W
LinkedIn
W
Yahoo! Japan
W
Naver
W
Quantcast
W
Call Tracking
W
Wunderkind
W
ADC Media
W
AgrantSEM
W
Bidtellect
W
Bing
W
G2Crowd
W
NMPI Display
W
VK
W
Adobe Target
W
Google Analytics (Advertising)
W
Trendkite
W
Hotjar
W
6 Sense
W
Terminus
W
StackAdapt
W
The Trade Desk
W
RollWorks
W

Are you sure you want a less customized experience?

We can access your data only if you select "yes" for the categories on the previous screen. This lets us tailor our marketing so that it's more relevant for you. You can change your settings at any time by visiting our privacy statement

Your experience. Your choice.

We care about your privacy. The data we collect helps us understand how you use our products, what information you might be interested in, and what we can improve to make your engagement with Autodesk more rewarding.

May we collect and use your data to tailor your experience?

Explore the benefits of a customized experience by managing your privacy settings for this site or visit our Privacy Statement to learn more about your options.