
On November 17, 2020, the latest Autodesk Netfabb and Netfabb Simulation releases became available for subscribers.
If you want just a quick overview, take a look at the What’s New in Netfabb 2021.1 video playlist (links to YouTube). Each video is around 1 minute long and will give you a high-level overview of the new functionality in this release.
In this blog, I want to highlight What’s new in Netfabb 2021.1.
As with each release, we added support for numerous 3D printers from several Manufacturers including Alkimat, EnvisionTEC, EvoBeam, Formlabs, HP, Progress Group, and XYZprinting. In addition, many of the machines supported by Netfabb can now have custom no-build zones, build room sizes, and build platform meshes.

We also focused on making some of the most requested changes to our user interface to improve usability. You can now create your own menu tab on the Ribbon with your favorite commands, including shortcuts to recent documents and Lua scripts. You can display parts with transparency and even control the transparency percentage. Netfabb will automatically assign up to 32 unique colors to your parts so you can easily differentiate one part from another in a crowded build space. Those same colors will also carry over to the slicing module.
While you are in the slicing module, you can turn on/off the background grid for better visibility of your contours and fillings. Talking about fillings, you can now choose a radial hatching when generating your toolpath.

The cutting workflows have also been improved with this release. When you are setting up a polygon cut, you can now constrain cut lines to become vertical or horizontal lines with respect to the cut plane using Alt+Click on the line. You can also assign a cutting depth to profiles you generate using the polygon cut method in order to create blind holes.
The repair module has also received several improvements with the 2021.1 release. There is now a dedicated function to split non-two-manifold edges within the repair module. Before the 2021.1 release, this was only available while checking the quality during a mesh export. Splitting non-manifold edges resolves the ambiguity when more than two triangles share a common edge. Also, if you run a repair script without entering the repair module, you can now undo that action if you are not satisfied with the outcome.
We also tidied up the duplication and packing tools. To address the various use cases of duplication, the duplication dialog is now split into 3 separate dialogs. You can duplicate parts or slices in place, duplicate them to fill a build volume or create arranged quantities with ease. To finish up what we started with the 2021 release, the 2021.1 release exposes additional settings of the Monte Carlo and Scanline packers within the Size Sorting packer that combines the two.
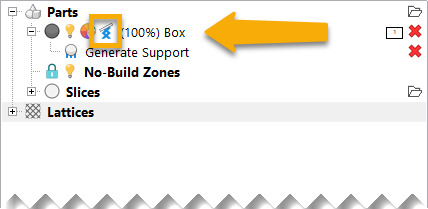
Support Structures have also been improved with this release. Solid volume supports can now be generated with fillets where they connect to the build plate to reduce residual stresses during the printing process. And when a part has supports, you can easily identify it, thanks to a new support icon that gets added to parts with supports in the browser.
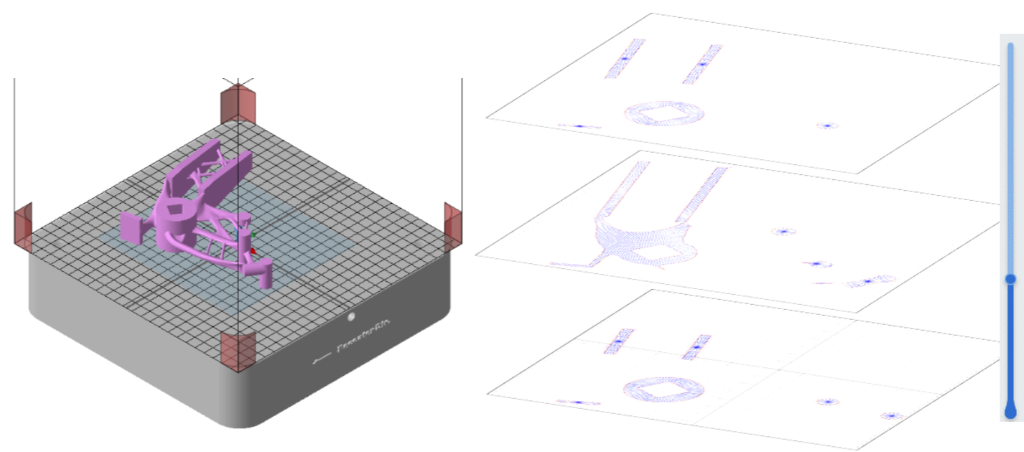
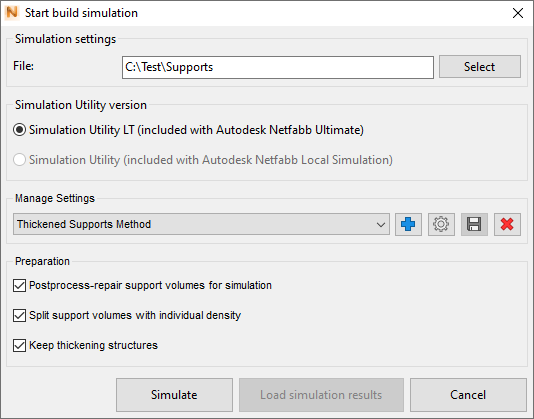
Those same support structures can now be sent over to the Simulation Utility with several new options to split support volumes with individual density and the ability to keep the thickening structures if necessary. Thanks to these new options, you can simplify your assumptions when simulating the metal powder bed fusion process to achieve increased accuracy when analyzing parts with various support structures. There are several other improvements specific to the Simulation Utility as well as the Simulation Solver, but that’s a topic of another blog entirely.
Now let’s change gears, and focus on automation with Lua scripts and toolpath generation using ATU (Advanced Toolpath Utility)
Netfabb uses Lua to facilitate automation in several areas such as automating repeatable jobs inside Netfabb and extending the out-of-the-box functionality of Netfabb with more custom workflows, slicing automation and the 3S module automation. Lua scripting is available in Netfabb Ultimate. The 2021.1 release includes a new launch parameter, which lets you terminate Netfabb once the startup Lua script finished running. In addition, several functions such as Mesh to Brep conversion and mesh face selection can now be executed using Lua scripts. This release also includes several new example scripts (C:\Program Files\Autodesk\Netfabb Ultimate 2021\Examples\LUA Scripts) to demonstrate these new functions and the entire Netfabb Lua API Reference is now available in the online help.

The Autodesk® Advanced Toolpath Utility for Netfabb® (ATU) is a development environment based upon a generic driver platform for additive manufacturing (AM) machines, which is used by Netfabb to generate machine specific build data. Model preparation, toolpath creation, and machine exports are fully programmable using the JavaScript language. ATU is available in Netfabb Ultimate. ATU has seen several improvements with the 2021.1 release. The parameter dialog now marks any modified parameter, but you can still see the default values by simply hovering over them and even reset them through their respective context menus.

At any given slice, you can now create ASCII text polygons using the new function bsPathSet.makeAsciiText. You can combine this, with translate (fTrans), scale(fScale) and rotate(fRot) methods on bsModel to fully customize your text placement orientation and size. We came up with this idea from a Netfabb Forum post when @caldwedd asked us how to go about “Adding text to slice files”. So, keep those questions coming…

This release also lets you generate lines at regular intervals on each path of a path set. You can use this function (bsPathSet.generateTransects) to generate cross hatches along a path, which can serve as overhang supports generated at the slice level.

Last but not least, you can now import volumetric level set data from 3MF files directly in to ATU. You can display level set data in as a background to your toolpath preview and offer a callback function in ATU to allow the buildstyle script to query level set. By means of these improvements in tandem, ATU can now use volumetric data stored in a 3MF as a stack of grayscale bitmaps to create toolpath of contours.

Although it seems like a lot of changes, all your workflows remain virtually the same so jumping into Netfabb 2021.1 will be as easy as ever!
If you are an active Netfabb subscriber, log in to your Autodesk Account to access Netfabb 2021.1. If you are upgrading from 2021.0 and or a single user subscriber, you don’t need to worry about a new license file or a license manager update.
If you are a Multi-User Subscriber and you are upgrading from 2020 or earlier versions, you will need to have a new license file created along with the installation and update to the latest Network License Manager, but if you run into any trouble, make sure you look through troubleshooting guides on the Autodesk Knowledge Network, or contact the Autodesk Support team for direct help. Also, make sure to update your Autodesk Desktop App, which is another way to access your Netfabb downloads.
For those not on subscription, reach out to your Autodesk partner or sales representative to learn more.


Add comment
Connect with: Log in
There are no comments