So got designs in other non Autodesk based civil design products?
Want to use InfraWorks for real time visualisation and easy production of realistic environments for your projects.
Then you want to read this post
So this example will take Bentley Mx as a source of data, but the methods are universal to any product that can create surfaces and design strings.
There is always five ways to do things, but I think this method is the better way.
This technique basically takes the final design and merge it in with the existing ground as a combined surface.
Then we use boundaries to define surface textures.
The advantage to this method is that is creates a clean and accurate model. Also when you place objects it will find the surface and you can also drape linework to represent roadmarkings etc.
Other techniques include bringing surface triangles from the other product and using as a 3D model, but then you cannot drape objects and roadmarkings, you would have to do it in the other product. Also you would need to texture the model first.
Final method is to bring in the core geometry and then use InfraWorks360 Design roads to remodel the data. If the design is not detailed, then this method is fine, but if fully designed, then you don’t want to try and remodel the whole project. Also design roads are not capable of every form of design at this point.
Ok, lets get started!
Import your data into AutoCAD Civil 3D, here I am importing a GENIO file through the import tool (available on subscription)
I am importing the design strings and the two surfaces (EG and Design)
Result of the imported strings and surfaces
Create a new _Combined Surface, by pasting the EG and then the design. Then save this file
Copy and paste the strings only into a clean dwg template, I am using ACADISO.dwt
Then convert all the strings to 2D polylines and elevation 0. There is a easy tool hidden in the Modify tab as you see below. Select the results and set the elevation to 0
This next part is a little effort, you need to create closed boundaries from the polylines, so I draw a line to close gaps and then use ‘mpedit’ command to select them all, join and add a small distance of 1 and close.
Then just adjust the layer to suit the type of feature they represent.
Next, use ‘mapexport’ command to export to a SDF file and in the ‘feature class’ tab you can select attributes to add the ‘layer’ to the poylines
Also check the ‘treat closed poylines as polygons’
So that method is a little effort, but is standard AutoCAD methods to create boundaries, you can always use them to create a coloured plan drawings also
There could be some time saving methods to generate these boundaries from the original civil design product that I may not be aware of.
When you use Civil 3D corridor models, these areas are generated automatically and of course is the added value to use Civil 3D as its a integrated solution.
In InfraWorks now, load in your Civil 3D dwg and check the _Combined Surface you made earlier.
You will get a grey surface, add an aerial image etc
Then add the SDF file and set as ‘coverage areas’
Under ‘source’ set to ‘Drape’
Under ‘table’ set the External ID to ‘Layer’
Once you have applied those settings, you can notice that the surface highlights. You can now drag and drop materials onto these areas. But a little extra automation is always a good idea.
So as a previous post described, we can use the new Style Rules in 2015.3 to customise data based on their attributes.
So here we will set the ‘Coverages’ to use the layer names to set the materials
Create a new style and enter this line of text
EXTERNAL_ID=’Carriageway Channels’ etc (for Civil 3D we use TAG as the value)
Then set your material in the style section
Once you have setup the values you want, save them to a file for reuse next time
Press ‘commit’ and then ‘run rules’
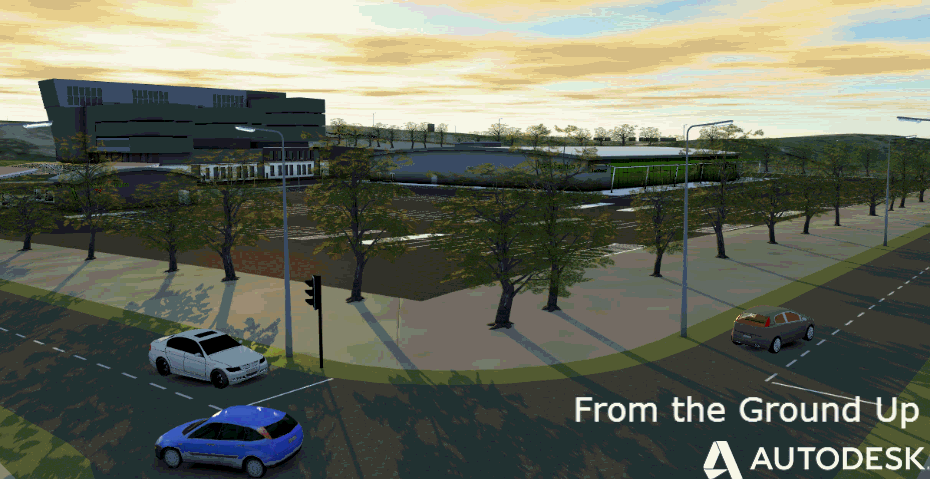
Then you should see your model update and voila!
Civil regards!