At this point we have created our new Item Lifecycle Scheme in Vault Professional 2015 R2, mapped out all the transition requirements and actions, defined the state based security for items and their attached files making our job almost complete.
The last few pieces now relate to the item state definitions as they relate to work-flow and system behaviors.
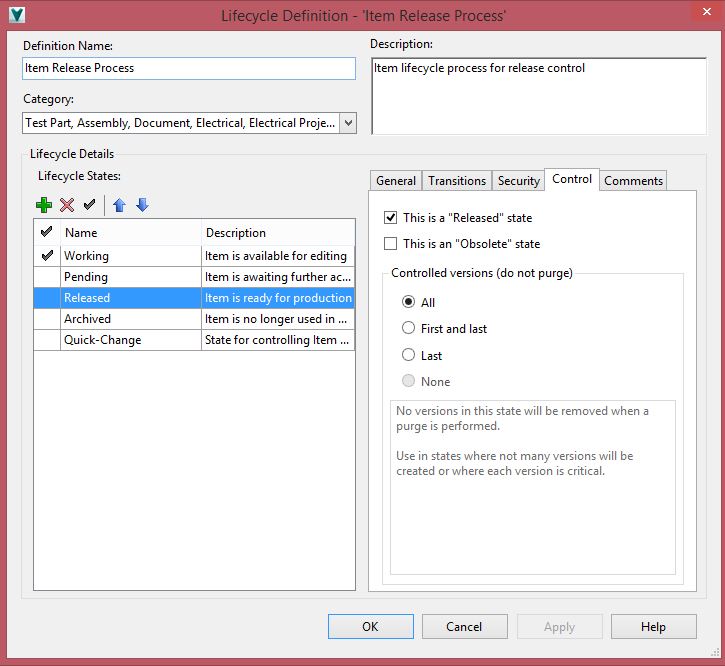
There are two important check boxes to start outlining this item behavior, defining whether the selected state is a "Released" or "Obsolete" state.
As our new custom released state can have any name and administrators can have more than one released state (think "Released to Construction" and "As Built" for example) we need to flag which states can be considered "Released". The "Released" state is used to control things like our transition rules where child items must be released to proceed with a release operation on the parent.
Similarly, when we want to restrict release of files that contain "Obsolete" data, we need to identify that state information here by checking "This is an Obsolete State".
Note that signifying this state as released or obsolete does not affect end user access, or our own transitioning rules – it merely informs system processes like conditional rules on lifecycles or item export settings. Typically a WIP or Review state has no special behaviors and would not be explicitly tagged.
This tab also contains the system purge controls for the lifecycle state. Another great new Item features in Vault Professional R2 is the ability to view the item versions we generate as modify the properties, BOM etc. (We have basically always created versions, we just didn't make them visible). Users can now (as they do with files) display versions or only revisions of items depending on their requirements and can purge unnecessary item versions.
For each state, the administrator selects whether or not to keep every version of that particular state on purge, remove all versions, or perhaps keep last or first and last.
In the example above, when we identify the state as a released state, there is no option to remove all versions – you have to have at least one – and I would suggest doing the same for obsolete states. The rest is at your discretion, I always like to err on the side of caution though and perhaps save at least one version for each state, in case you are wondering what changed after review for example.
So there you have it, a completely configured item lifecycle scheme with all behavioral conditions applied, as a final touch though, jump in and add some Comments.
The comments are the default text that appears when you execute a lifecycle transition, they're designed to help others understand the state intent, like "Sent for Customer Approval" or "Approved by Line Manager" for example, these can be edited when needed but its a nice touch to have a clear descriptive comment for the lifecycle action.
- Allan

