
Five Autodesk Inventor iLogic productivity hacks for non-programmers: Data conformance.
In the last blog post, we learned how a simple way to add an iLogic form to a part model to better communicate design intent. We could call this conformance–conformance with our modeling standards.
This post is one of a five-part series that demonstrates simple methods to get started with iLogic. In this exercise, we’ll see how iLogic can help us with a different type of conformance–this time, conformance with our data standards.
3D parametric design software has many advantages over technology such as 2D CAD or hand drafting. Most of these advantages benefit the designer. However, there is one advantage of modern CAD that benefits everyone involved with your project—Data.
The ability to provide the data from your design in a format that your colleagues can use helps to reduce data re-entry, meetings, and mistakes–increasing the quality of your process and reducing overall time on your project.
The trick is ensuring the data is entered consistently and correctly from the start…
You don’t have to fill out every iProperty that Inventor offers, but you do need to fill out the required iProperties every time.
So, let’s learn how iLogic can help us with data conformance.
This content was originally presented as a hands-on Lab at AU 2023. You can download a handout, presentation, dataset, and videos of the demonstrations from the AU class page:
IM602043-L Five Autodesk Inventor iLogic productivity hacks for non-programmers! [Lab]
Autodesk Inventor iProperty Data conformance with iLogic.

Inspect the iProperties for a part file. Which iProperties are important to you?
For this exercise, we are going to track the following:
- Author
- Part Number
- Description
- Eng. Approved by:
- Eng. Approved date:

Set the Inventor iLogic form to appear when the data is not complete.
The dataset for this class contains an iLogic form that can be used to fill out these iProperties.
If you want to follow along, click here to download the example dataset and demo video.

I hope you can see how this iLogic form will help users understand which iProperties they need to fill out for this Part document.
Let’s not rely on the user to remember to trigger this form. Let’s create an iLogic Rule to remind them (iLogic code is called a ‘Rule’).
Here is the logic for this Rule, written in longhand:
When this file is saved, If the iProperties ‘Author’ or ‘Part Number’ or ‘Description’ or ‘Eng. Approved by’ or ‘Eng. Approved date’ are empty – then open the form DATA CHECK.
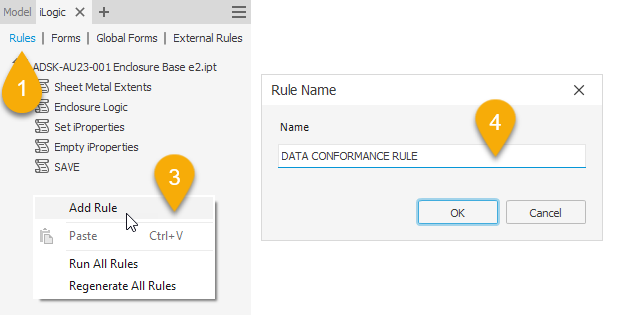
- In the iLogic panel, LMB click on the Rules Tab.
- In the iLogic panel, hover your cursor over an empty space, and RMB click.
- Choose Add Rule from the flyout.
- The ‘Rule name’ dialog will open. Type DATA CONFORMANCE RULE into the input box, and LMB click the OK button to create your rule.
- The iLogic Rule editor will open.
In this tutorial, I aim to get you started with iLogic as quickly as possible–so I won’t explain the iLogic editor in depth.
Copy and paste the following code from this blog post into the iLogic code editor:
‘If the following iProperties are empty…
IfiProperties.Value("Project", "Description") = "" _
OriProperties.Value("Project", "Part Number") = "" _
OriProperties.Value("Summary", "Author") = "" _
OriProperties.Value("Status", "Eng. Approved By") = "" _
OriProperties.Value("Status", "Eng. Approved Date") = "01/01/1601"Then
‘Then show this form.
iLogicForm.Show("DATA CHECK")
EndIf
‘Update this document.
InventorVb.DocumentUpdate()
This code does the following:
If the iProperty ‘Description’ string is not empty (it has any value), do nothing.
If the iProperty ‘Description’, contains an empty string, then open the form ‘DATA CHECK’.
It examines the remaining iProperties in the same way using an ‘Or’ statement.
If this is true, OR this is true, OR this is true, OR this is true—then, do this….
- We are done coding for now. From the iLogic Rule editor dialog, in the bottom right-hand corner, LMB click on the Save button. From the same place, LMB click on the Close button.
Nothing happened? OK! That’s expected.
Set an iLogic rule to run before the document is saved.
The action of Saving a file is known as an ‘Event’. An Event can start something happening. This Event is now known as a ‘Trigger’.
When the user saves this file (the Event), we want to Trigger the iLogic rule we called ‘Data Conformance Rule’.
Let’s learn how.

- Navigate to the Manage Tab > iLogic Panel.
- LMB click on the Event Triggers button.
On the right-hand side is a list of Events. Note the Event Before Save Document.
On the left-hand side is a list of iLogic rules in this document. Note our iLogic Rule Data Conformance Rule.
- From the Event Triggers dialog, Rules in this document area, LMB click-and-drag the Data conformance rule into the Rules On Events area, and drop it (let go of the LMB) under the Before Save Document Event.

You have now attached your iLogic rule to the Before save event, meaning that your rule will run before this document saves.
Let’s test!
Try saving this Part document. The action of saving this file will run the ‘Data compliance rule,’ which will check to see if the iProperties are empty, and if they are – the ‘DATA CHECK’ form will open so that our user can easily fill out the required information.
Tip: iLogic forms and rules are typically saved in the file you are working in, meaning the changes you’ve made aren’t saved until you save the open file. When working on your own iLogic projects, save your files regularly to save the changes to your iLogic Rules and Forms—or explore external Rules.
That was fun! What can I learn about iLogic next?
There are five block posts in this series. Read them all!
- Use an iLogic form to communicate design intent.
- Create a simple iLogic rule to check data compliance.
- Use iLogic for Top-down design
- Use iLogic for Assembly configurations
- Use an iLogic form to standardize drawing title blocks.
Click here to download step-by-step instructions, dataset, and demo videos.
How can I find out more about Inventor iLogic?
AU (Autodesk University) is Autodesk’s flagship customer event, but the learning doesn’t stop when the in-person event is over. On AU Online, you can find on-demand class videos, handouts, and data sets, so you can enjoy learning from industry experts, partners, and your peers the whole year round—it’s all free, no log-in required.
To help you find the product design and engineering content you need, we’ve created a landing page that curates design and engineering content from AU specifically for you.


