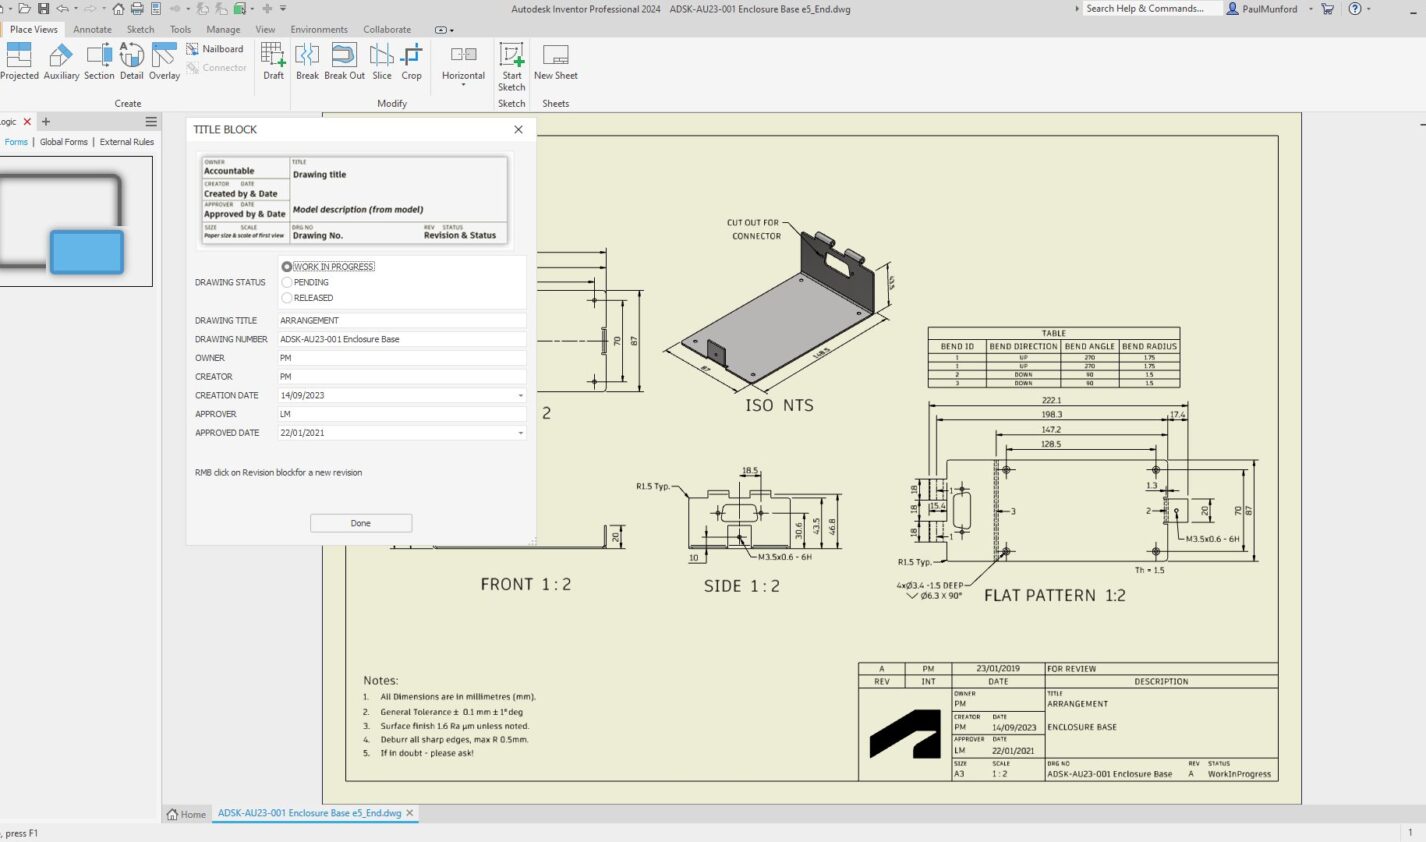
Five Autodesk Inventor iLogic productivity hacks for non-programmers: Drawing title block form.
One task that has always bugged me is filling out the title block. What do I need to edit? Field text? iProperties? iProperties of the drawing? Or iProperties of the model?
Please tell me what information I need to add, and where I need to add it!
We can make this a lot easier, by creating an iLogic form which collates all the inputs in one place.
This post is from a series of five iLogic examples. In this exercise, we’ll see how we can use an iLogic form to standardize the process for filling out title blocks.
This content was originally presented as a hands-on Lab at AU 2023. You can download a handout, presentation, dataset, and videos of the demonstrations from the AU class page:
IM602043-L Five Autodesk Inventor iLogic productivity hacks for non-programmers! [Lab]
Creating an iLogic form to populate a drawing title block.
An Autodesk Inventor iLogic form can be a great tool to ensure that your team conforms with your drawing and data standards— without the need to read your CAD manual!
By creating an iLogic form, you are making it easy to comply with the CAD standard automatically.
To create the form: In your Inventor template DWG or IDW
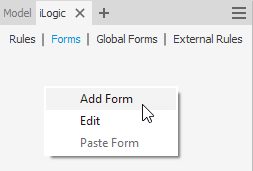
- Navigate to the iLogic browser, Forms tab.
- Hover your cursor over any free space, and RMB click.
- From the flyout LMB click on Add Form.

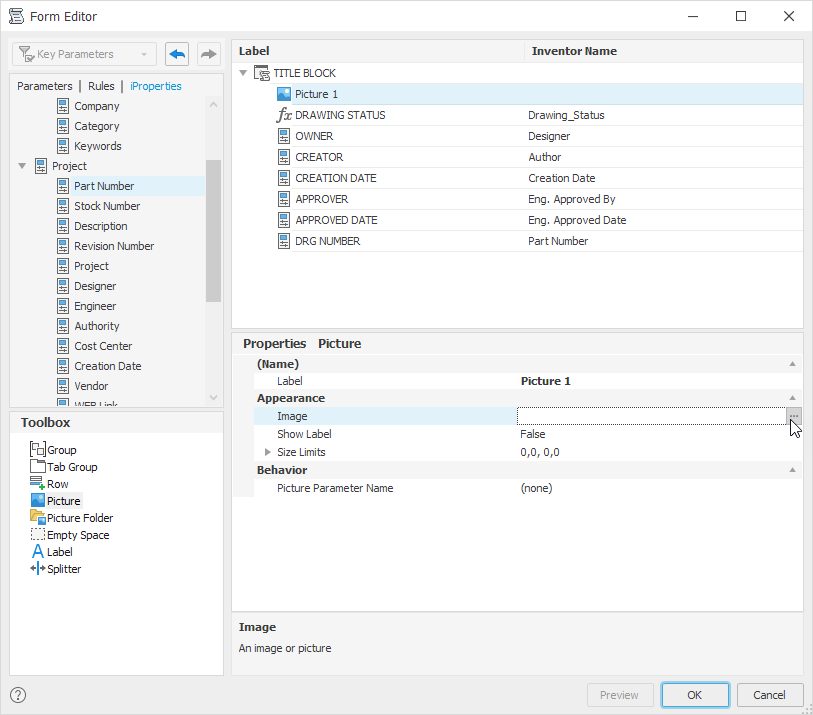
The form Editor Dialog will open.
If you want to follow along, click here to download the example dataset and demo video.
- LMB click into the form builder cell for Form 1. Enter TITLE BLOCK. This will change the form name.
- On the left-hand side of the form editor, under ‘parameters’, find Drawing_Status.
LMB click-and-drag the Drawing_Status user parameter into the form builder area
- In the form builder area, in the cell for ‘Label’, to the left of Drawing_status, enter DRAWING STATUS. This will change the label on the form.
- With DRAWING STATUS selected, browse the properties. Under Behaviour find Edit control type.
- LMB click on ‘Combo box’, from the drop-down menu, choose Radio Group.

Use the data from the table below to add the remaining controls:
| NAME | TYPE | SOURCE | PROPERTY | IPROPERTY TAB | NOTES |
|---|---|---|---|---|---|
| OWNER | Standard iProperties | Current Drawing | Designer | Project | |
| CREATOR | Standard iProperties | Current Drawing | Author | Summary | |
| CREATION DATE | Standard iProperties | Current Drawing | Creation date | Project | |
| APPROVER | Standard iProperties | Current Drawing | Eng. Approved by | Status | |
| APPROVER DATE | Standard iProperties | Current Drawing | Eng. Approved date | Status | |
| SIZE | Sheet Properties | Current Drawing | Sheet size | n/a | Auto completed |
| SCALE | Sheet Properties | Current Drawing | Initial view scale | n/a | Auto completed |
| TITLE | Standard iProperties | Current Drawing | Title | Summary | |
| DECRIPTION | Standard iProperties | Primary or Attached Model | Description | Project | Auto completed (if the data is in the model) |
| DRG NO | Standard iProperties | Current Drawing | Part number | Project | |
| REV | Standard iProperties | Current Drawing | Revision number | n/a | Controlled by the Revision table |
| STATUS | Standard iProperties | Current Drawing | Design state | Status | Controlled by an iLogic rule |
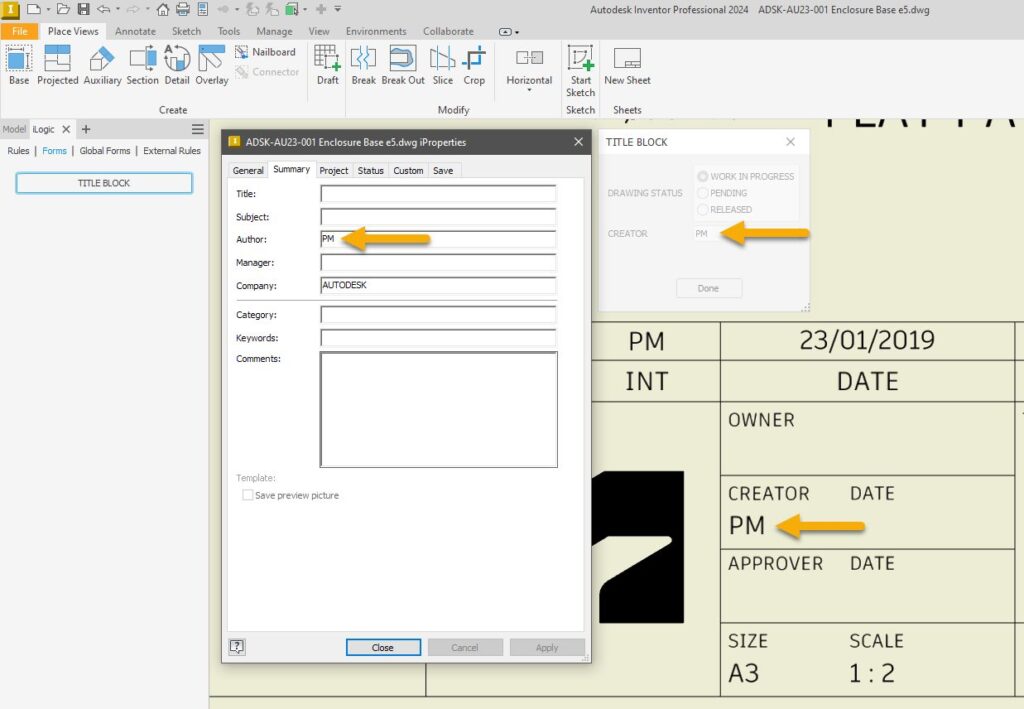
To test the form, click the ‘OK’ button in the form editor, then browse to the iLogic panel and click the ‘TITLE BLOCK’ button.

Note how the data updates in the title block when entered into the form. Open the iProperties for the file and see the data you entered into the form.
Making standard procedures easy to follow will increase the likelihood that standards will be followed. Automating a small task like completing a title block can save time and money when you consider how many times a day your users need to update title block information, particularly when you factor in the cost of data not being added or added incorrectly.
How might you implement this workflow at your company? Can you figure out how you might cause the title block form to open automatically if the data is incomplete?
Tip: iLogic forms and rules are typically saved in the file you are working in, meaning the changes you’ve made aren’t saved until you save the open file. When working on your own iLogic projects, save your files regularly to save the changes to your iLogic Rules and Forms—or explore external Rules.
That was fun! What can I learn about iLogic next?
There are five block posts in this series. Read them all!
- Use an iLogic form to communicate design intent.
- Create a simple iLogic rule to check data compliance.
- Use iLogic for Top-down design
- Use iLogic for Assembly configurations
- Use an iLogic form to standardize drawing title blocks.
Click here to download step-by-step instructions, dataset, and demo videos.
How can I find out more about Inventor iLogic?
AU (Autodesk University) is Autodesk’s flagship customer event, but the learning doesn’t stop when the in-person event is over. On AU Online, you can find on-demand class videos, handouts, and data sets, so you can enjoy learning from industry experts, partners, and your peers the whole year round—it’s all free, no log-in required.
To help you find the product design and engineering content you need, we’ve created a landing page that curates design and engineering content from AU specifically for you.


