Following the launch of BIM 360 Cost Management this year, the Cost Management team has released a number of enhancements to help you better manage all cost-related construction activities and simplify the change process.
Fundamental Forecasting Functionality
As the first step to incorporating forecasting functionality into Cost Management, we have added new columns in the Budget & Contracts tab, which allows you to make forecast adjustments, view forecast final costs, and forecast variances.
To help demonstrate how you might use this feature, let us look at a real-life example (see video below). You have an approved budget of $5,590,416.37 for your internal site management staff; you can see this in the Projected Cost column within the Budget tab. Every month when you get your actual costs in, you can input the amount in the new Actual Cost column. If you don’t make any adjustments, in the Forecast Cost to Complete Column and the Forecast Final Cost column you will see the same total as the Projected Cost column.
But say you need to add two more staff to the project, which will end up increasing the final cost to more than what was approved. Here is where the Forecast Adjustments column comes into play. Click to open the edit forecast adjustments window and add a line item for each staff member. Once the adjustment is complete, the Forecast Adjustments Column will display the total adjustment amount, and the Forecast Cost to Complete and Forecast Final Cost columns will reflect the change. You can also easily view the variance in the Forecast Variance column. Teams now have fundamental forecasting functionality at their disposal.
Workflow-Based Actions
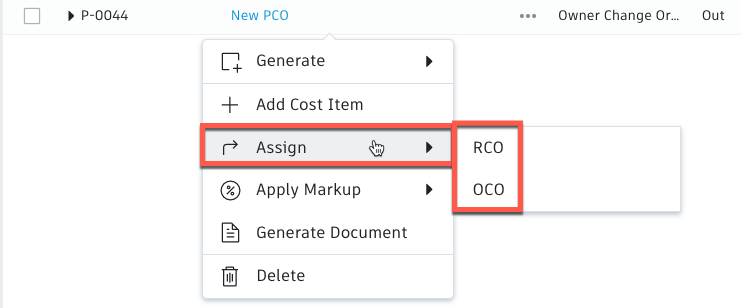
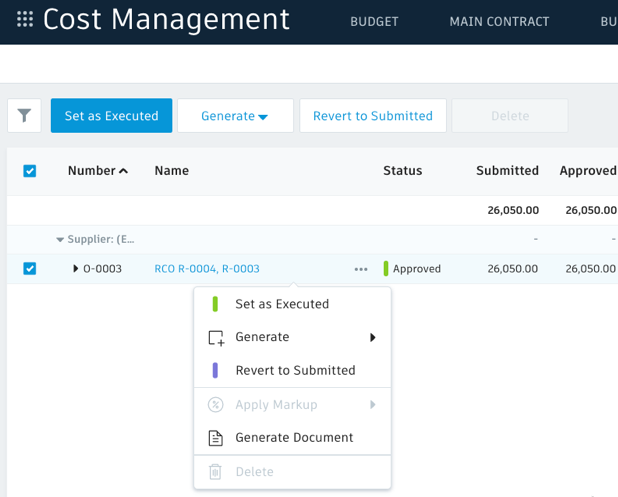
Now, as you move cost items through the change process, BIM 360 provides selectable workflow-based actions that offer options for the next steps to take. These actions are designed to help advance you through the system while also automatically updating statuses accordingly.
For example, in the video below on the top of the details flyout panel, you see the workflow-based actions appear as we move an ‘open’ Request for Change Order (RCO) through the process to generate an Owner Change Order (OCO). The option to create an OCO only appears once the RCO is submitted and accepted. By adding a level of automation, the process is easier to understand and manage.
Flexible Generation of Supplier Change Orders (SCO)
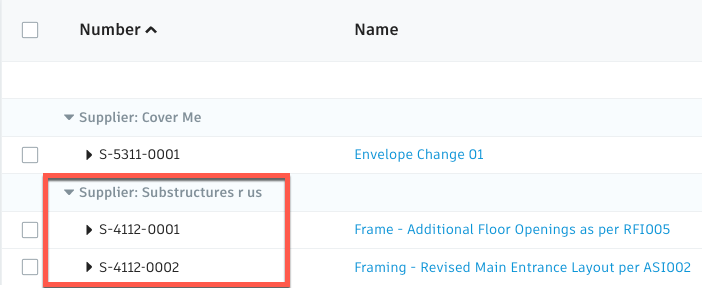
Now, with the addition of workflow-based actions, the opportunity to generate an SCO is only made available once the item has transitioned to a specific status making the process clear eliminating any confusion.
You will only be prompted to generate SCOs from a Potential Change Order (PCO) with a budget and cost status of Open, a Proposed Request for Quote (RFQ), an Accepted Request for Change Order (RCO), or an Approved Owner Change Order (OCO).
Caption: Generating a SCO from a Submitted Request for Change Order (RCO).
When generating an SCO, you can easily create a single SCO by selecting the checkbox next to the cost item within a parent. Or they can create a SCO from selected cost items within one or more parents.
SCOs can now also be removed from the generation page if user decides to postpone until later by selecting the trash icon

Customized Tab Naming
Project Admins have access to customize the default subtab names within the Change Order tab (Cost Items, PCO, RFQ, RCO, OCO, SCO). This level of customization allows teams to avoid confusion and enhance their workflows by incorporating the terminology they use into the system.
Changing the tab name “PCO” to “Cost Event” in the Change Order Tab of BIM 360 Cost Management.
Additional usability improvements:
Formatted Budget Export:
The Budget view can now be exported as a formatted xls file to show change order references underneath each budget item.
Attach xCO to to existing xCO:
Flexibility to make last minute additions to existing change orders. For example, adding a new Potential Change Order (PCO) to an existing Request for Change Order (RCO) or Owner Change Order (OCO).
Relative Codes:
You can now collate multiple PCOs into a single RCO and multiple RCOs into a single OCO etc. So while we have a system code for each cost item, we generate a code relative to each part of the change process. Likewise, with an RFQ and SCO they can be set as sequential per supplier or project.
Relative to Supplier
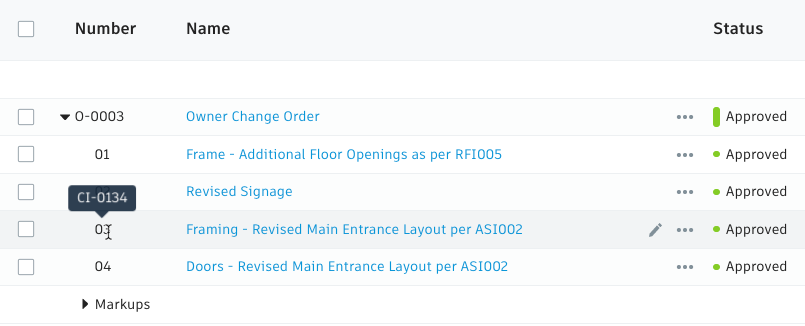
Relative to Owner Change Order, Cost Item 0134 is item 3
Budget Transfer History:
Budget transfer history shows a complete audit trail of transfers in the flyout which can also be exported to csv.
![]()
Menu Changes:
The 3 dot button which opens the context menu (also available by right click) has been moved next to the ‘Name’ field. The basic and workflow based action buttons have been moved from the right side of the screen to the left and are also now available in the context menu now allowing for quicker access and less screen traversing to carry out tasks
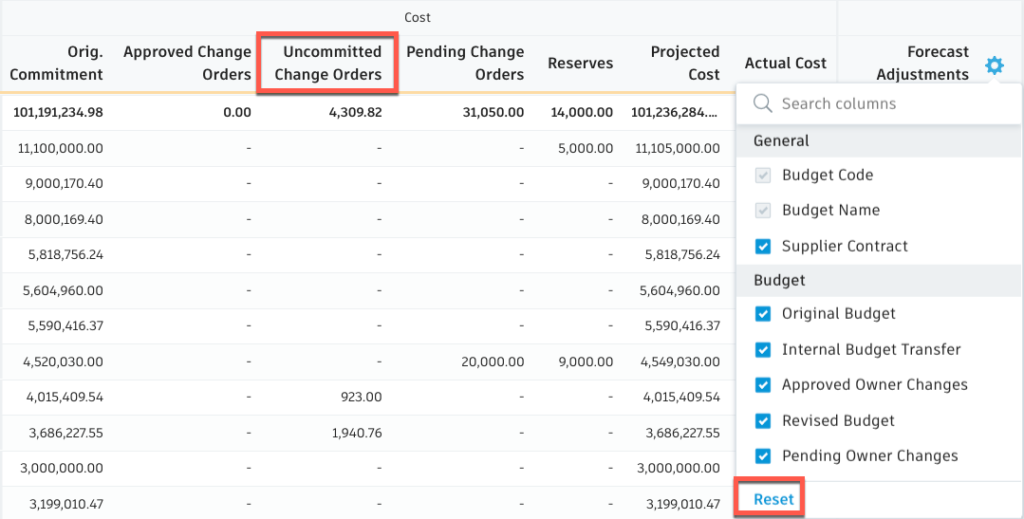
Uncommitted Change Orders:
New column in Budget and Contracts Overview indicating if there are Approved Owner Change Orders not allocated to Suppliers. (Note if this column is showing in a different order please select ‘Reset’ at the bottom of the column settings menu available from the gear icon at the top right of the table)
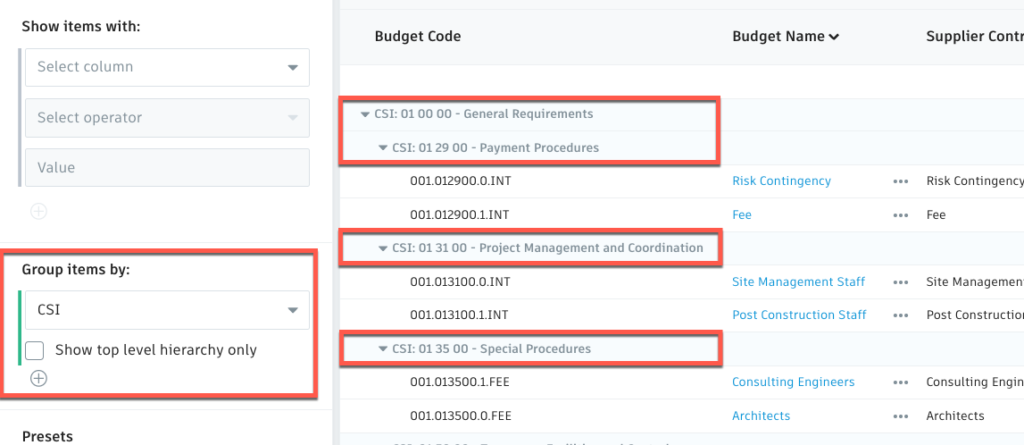
Grouping:
If you have multi hierarchy grouping in your budget segments you can now select to group only by the highest level if preferred

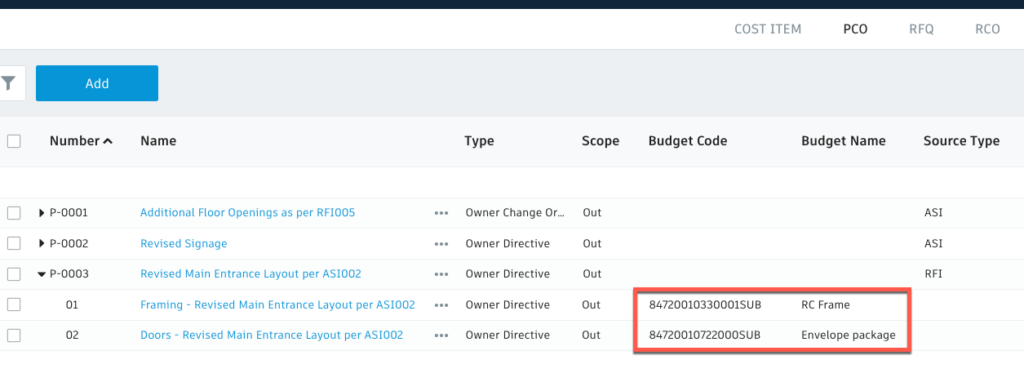
Budget:
Budget code and name are now also assignable and viewable in table views so you aren’t required to open the flyout to create and link a PCO and cost item
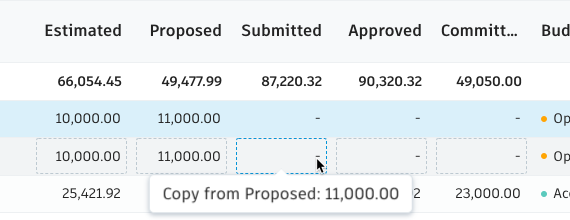
Cost Field Input:
As you move through the change process the cost fields can now be auto populated from preceding fields required. On hover you will be asked if you’d like to copy
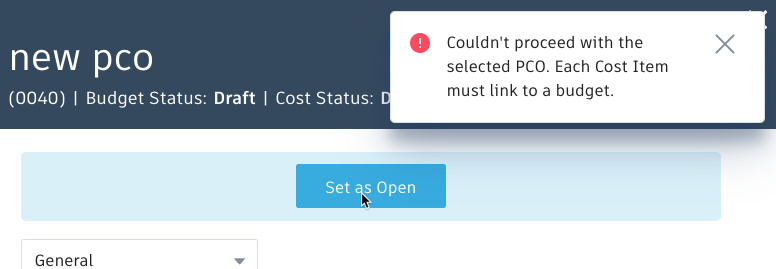
Cost Item to Budget links:
We now inform the user if a cost item hasn’t been connected back to the budget and prevent it being processed further to save time