
Earlier this year, I shared what I’ve learned about sketching in Create VR and what that means for concept modelers and designers, illustrators and concept designers. You can also check out Colin Smith’s overview on what’s possible in Create VR, as well as other videos in this series: Creating a Concept, Review and Feedback, Setting the Scene, and VR Review.
If you’re new to Create VR, this guide is meant for you. We’ll go through how to use the controls, basic tools, and import reference.
Get Familiar with the Controllers
One of the first things to get used to will be the controllers. The controller in the non-dominant hand is for spawning the menu and global manipulation of the objects in the scene. This controller can be thought of as the supporting hand that holds the paint palette or spins the turntable to see the model from a different vantage point. By default, the non-dominant hand is the left hand, which can be changed in Settings.

Pulling the trigger button on the non-dominant hand will bring up the main menu containing tools, layers, and other options. This is where you’ll find most of the tools in Create VR.

Pressing grip on the non-dominant hand will let you move all objects in the scene to get a better viewing angle. This is called a global grip. Global grip always moves all the contents of the scene, so you don’t need to grab a particular object: you can just grab the air.
Your dominant hand controller is used primarily for content creation and moving objects. You can think of this controller as your main hand. It is like holding a pencil or grabbing pieces of clay to move to another spot in the model.

Pulling trigger on the dominant hand lets you select tools in the menu, place CVs, make modifications, and sketch.

Pressing grip on your dominant hand while the stylus tip is touching a model will allow you to grab a specific object. This is called an object grip.
Holding one grip after the other and moving your controllers allows you to pan/rotate/zoom the scene or translate/rotate/scale specific objects. The first grip pressed determines the operation.

Pressing Non-Dominant Grip (Global Grip) followed by Dominant Grip (Object Grip) anywhere will scale and/or rotate the whole world. This can be thought of as panning/zooming/rotating the view and navigating around a scene.

Pressing Dominant Grip (Object Grip) on an object followed by Non-Dominant Grip (Global Grip) will scale and rotate those specific objects in the scene. This can be thought of as transforming objects in your scene.
Know Your Drawing Tools
Sketch Curve Tool

You can draw a freeform curve using this tool. Hold down the dominant-hand trigger and swipe your hand in the air to draw a freeform curve. This is great for creating loose sketches and drawings.
Curves

You can draw a NURBS curve with this tool. Pull trigger on the dominant-hand tool to place CVs and create a smooth curve. It is useful for creating more intentional linework, especially if you plan to use the curves to create surfaces later. You can resize the stroke the same way as the Sketch Curve tool. Press the Checkmark icon on your dominant-hand to complete the curve. This is a useful tool for creating clean curves on top of your rough line sketch.
Undo & Redo
If you ever make a mistake, on your non-dominant hand you can press left on the analog stick (Oculus) or left on the d-pad (Vive) to undo. Press right on the analog stick or d-pad to redo.
Change the Brush Size

Once you’ve chosen your drawing tool, you can resize the brush by pressing up/down on the dominant hand analog stick on the Oculus Touch. If you’re using Vive controllers, soft tapping up/down on the D-pad will resize the brush.
Change the Color
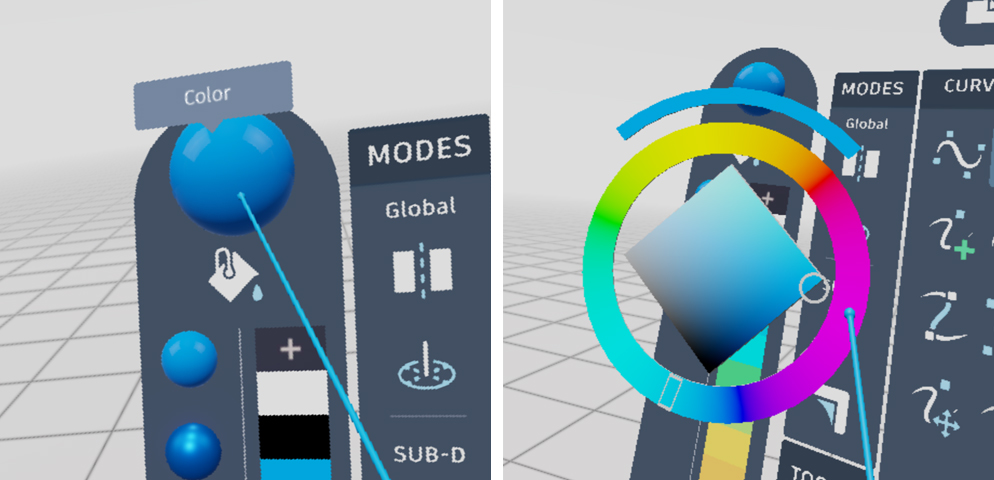
You can change the color of the stroke on the left side of the main menu. Pull trigger on the sphere to bring up the Color Wheel. Choose the hue from the outer circle and adjust the saturation and luminosity from the square. Select the paint bucket and then pull trigger on the object to change its color. You can add colors you like to the Swatches Palette by using the “+” button on top of the swatches.
Materials

To the left of the color swatches are the materials. Using the Paint Bucket tool, you can apply a lambert, phong or flat material in addition to the color. Lambert has a smooth matte look without highlights. Phong is great for simulating the appearance of shiny surfaces. The flat material is effective for giving black strokes better visibility and producing a more illustrative look and feel.
Tools for Editing & More Control
Add CV
Use this to add more CVs to a completed curve. Pull trigger with the dominant-hand controller on a curve to place a CV. Adding CVs is useful for getting more control over the shape of the curve, or adding more detail.
Snapping CVs
Press A on the dominant-hand (Oculus) or right on the D-pad (Vive) to turn on snapping. A magnet will appear on your controller to indicate that it is active. When you move CVs of surfaces or curves using the Move CV tool, they will now snap to other CVs.
Extrude

You can use this tool on the endpoint of curves to create a new curve. This can be useful for extending the visual length of a curve while adding a break in between.
Import Reference Images/Models
If you prefer to work with references, you can add 2D image references or 3D models into your scene to help with the process. Add the images and models you wish to import into the following directory:
Users\Your Username\Documents\CreateVR\Assets
Add 2D Reference Images

Go to the main menu. Look at the Layer Palette on the right side. Choose the Import Image option to select an image.
You can place your image in the room space where they will be anchored and remain stationary–this is useful when you have multiple references or inspiration images you need to reference. Use up/down on the dominant-hand analog stick (Oculus) or soft tapping up/down on the D-pad (Vive) to resize the image. You can also place it directly onto the symmetry plane. You can align the image and have it lock to XYZ directions (the axis will turn red, blue, green respectively). When placed this way, images are not anchored and will move with your model. This is helpful if you are directly referencing and drawing on top of the image planes.
Add 3D Reference Geometry

On the same Layer Palette, pull trigger on the Import Geometry icon. After selecting the file, it will load into the scene right away. You can grab, move or resize the reference geometry the same way you interact with models in the scene.
Surface a Rough Volume
As you work on your sketch, you may want to block out the underside of the sketch with a volume to hide the sketch that shows through your model.


You can use the sub-d Extrude tool to easily extrude surfaces off of curves you created. I suggest starting with the centerline of your sketch, if you have one, and pulling a surface from there.

As you hover on the boundary edge of a sub-d surface, if you press right on the dominant-hand analog stick (Oculus) or up on the D-pad (Vive), you can switch between selecting One, Full or a Smart Selection of edges to extrude.

If you are using the sub-d Patch or Volume tool, Create VR is contextually aware and will automatically switch to Extrude on boundary edges and faces, Insert Edge Loop on interior edges, Move CV on vertices, and Weld when highlighting two edges. This can be really helpful for speeding up your workflow.

Drawing in Create VR is a helpful tool for designers and artists to explore different concepts in 3D. It’s also a great introduction on how to 3D model, with geometry that you can import into other apps and continue working on.
If you missed my introduction to Sketching in Create VR, check it out here.
FAQ
How do I get Create VR?
Create VR is available for Alias 2020.2 onwards and Maya 2022. You can access Create VR under the VR menu in Alias or through the splash screen. Create VR for Maya can be downloaded as a free plugin from the Autodesk App Store. Use the Plug-in Manager to load Create VR, afterwards it can be launched under the VR menu.
Can I open my file in other applications?
Create VR creates an .fbx file whenever you save in Users\Your Username\Documents\CreateVR\Saves. You can import this .fbx file into Alias, Maya or other applications and continue to work on it.

What headsets does Create VR support?
Create VR supports:
Oculus Rift S and Oculus Rift Touch Controllers
HTC VIVE Pro, HTC VIVE, and VIVE Controllers
High performance is critical to a pleasant VR experience and is essential to reduce any discomfort. For a viable working performance, we recommend a NVIDIA GTX 1080 graphics card, equivalent, or better. Our processor recommendation is Intel Core i7-7700 or better. And for memory, you ideally want a minimum of 16GB.
Continue Learning
Check out the Create VR Help documentation to continue learning how to use features in Create VR.