 Autodesk Forma Team
Forma Site Design, available in the AEC Collection or as a standalone subscription, offers powerful AI-powered tools for architects and designers in pre-design and schematic design phases.
Get to know Autodesk Forma Site Design’s tools
Forma Site Design offers a clean and intuitive layout with multiple tools and panels that help you design, analyze, and manage your work efficiently. Here’s a quick guide to familiarize yourself with the main areas of the interface.
Note: the embedded Help Center articles require an Autodesk account.
Canvas

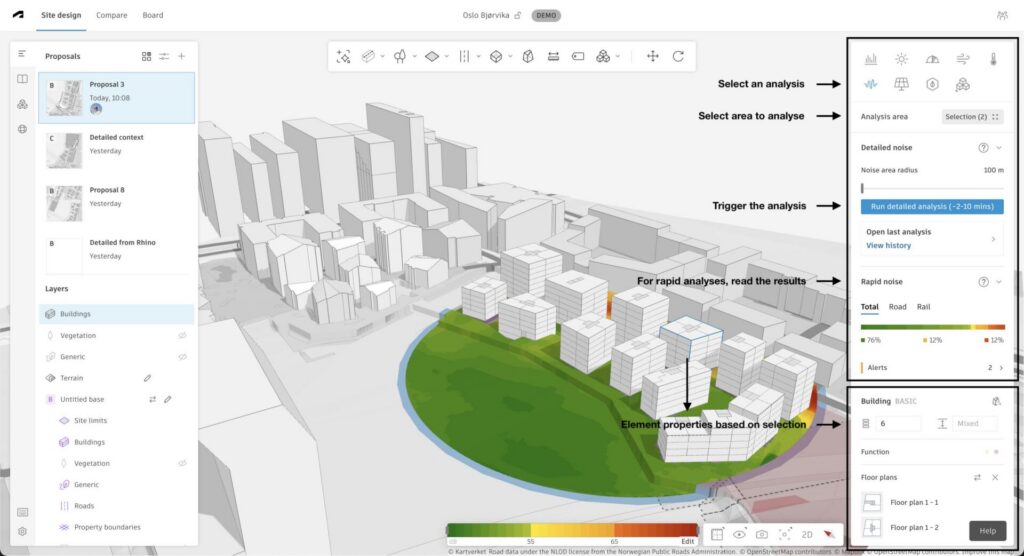
After you have created a site and ordered data, you enter Site Design. The central space is the canvas, where you view and edit your site.
Contextual help (bottom of the canvas): Provide shortcuts and tool tips while you’re designing.
Top bar

The top bar provides quick access to different apps and tools:
| Mode | Description |
| Site Design | Create and manage your site and models |
| Compare | View different proposals or analysis results side-by-side |
| Board | Add proposals, notes, and visuals to communicate your design ideas. You can even add Revit Sheets from your Docs |
Additional features:
- Autodesk logo: Return to the Home page for resources and site overview
- Project overview: Return to your project
- Site name: Double-click to rename
- Lock icon: Set site access (invite-only or visible to all Hub members)
- Members: Invite team members to collaborate
Sidebar (left-hand side)

The sidebar helps you navigate components of your site and relevant tools:
| Section | Description |
| Navigator | Browse, create, and manage proposals and base layers |
| Library | Import or manage data and models |
| Extensions | Install and manage third-party tools |
| Contextual data | Add real-world data such buildings, roads, terrain, and basemaps through our integrated data providers |
Additional features can be found on the bottom of the sidebar, these are:
- Quick access (Q) opens up a menu with supported actions and their shortcuts
- Settings allow you to edit functions and unit sizes, as well as change the way metrics are calculated for both buildings and surfaces. Here you can edit settings for analysis and change unit measurements.

Navigator: Manage proposals and bases
Use the Navigator to organize proposals in your site:
Proposals

A proposal represents a design concept or version.
- Add a new or duplicate proposal to create variations.
- Design layers are stored under each proposal.
- The three icons over the proposal list can be used to
- Compare proposals
- Filter the proposal list based on which base they are using
- Create a new proposal
- More proposal options can be found by right-clicking the proposal or by clicking the three dots
Proposal layers

All elements on a proposal are listed under Layers. They are grouped into preset categories, and each layer is automatically named according to its geometry type.
now. There are several possible actions that can be done:
- Layers can be locked from editing
- The geometry can be hidden from the canvas
- By clicking on a layer, you automatically select all objects in the canvas
- You can also edit the terrain by clicking on the pen symbol
Bases

Bases represent the site environment (e.g., context buildings, roads)
- A single base can be used in multiple proposals
- Bases are labeled with a letter shown in the proposal thumbnail
- Rename a base by double-clicking the name of the base
- Swap a proposal’s base by clicking on the two arrows and selecting another base
- You can move geometry and elements between a base and proposal layers by selecting them > right-clicking in the canvas then Move to base/proposal
To move geometry from one base to another, follow these steps:
- Select the elements and copy them Ctrl/Cmd + C
- Swap base
- Paste the elements through Ctrl/Cmd + V
Design toolbar (main canvas tools)

Create and shape your site using the design toolbar:
| Tool | Description |
| Site automation | Quickly generate and test layouts |
| Buildings | Draw line buildings, basic structures, or houses |
| Vegetation | Add trees with line or area tools |
| Limits | Define site limits, zones, and constraints |
| Roads & rails | Draw infrastructure elements |
| Generic shapes | Add abstract or placeholder geometry |
| 3D sketch | Enter sub-mode for freeform modeling |
| Measure distance | Measure between points in 3D |
| Label | Mark specific points with short text notes |
| Extensions | Add and use tools from third parties or custom extensions |
Right panel: Analyses and element properties

The right panel is dynamic and context-sensitive. Here’s what you can access in it:
- Analysis menu: Run sun hours, daylight potential, wind, and other simulations.
- Element properties: When you select an element, a section in the right panel opens where you can:
- Adjust basic parameters of the building(s), such as its height,number of floors, or assign a function (e.g., commercial or residential)
- Adjust building type specific parameters based on what kind of geometry that is selected. In the example above, it is possible to adjust the Floor plans of the building
💡 Example: When selecting a line building, you can modify its width, which edge it should align to, floor count, floor height, sections lengths and functional category.
Visibility and orientation tools

Located in the bottom right corner, these tools help you control how you’d like to interact with the canvas:
| Tool | Function |
| Guides & measurements | Toggle snapping, show elevation at the cursor, swap units between metric and imperial |
| Display options | Switch between building colors, terrain visualization and shadows |
| Camera position | Save & load camera views and export to SVG or PNG |
| Camera options | Align the camera to a facade (ctrl/cmd + E)Look from a specific point (ctrl/cmd + L)Zoom to fit (ctrl/cmd + F)Activate a section box |
| 2D/3D view | Toggle between 2D and 3D modes |
| Orientation | Align the view to True North by clicking the compass |
Help menu

Need support?
- Click the Help button in the bottom-right corner
- Browse different sources of help
- Open Help Center articles without leaving Site Design
- Be guided by Tasks that outline your progression
- See what new features have been released under News
- Look at previous Messages that has been sent to you
- Link to our community
- Ask a question (AI chat and human support.)