 Autodesk Media & Entertainment
The hardest part of building a shot isn’t always creating the pieces. It’s deciding how they should work together.
Maybe you already have a character and a performance in mind, but still need to figure out the world around them. Or you know exactly how you want a shot framed but want the freedom to keep experimenting with its final look. 3D Editor + Canvas in Autodesk Flow Studio gives you different ways to work through those decisions, while keeping everything connected as the scene takes shape.
To see how that works, let’s build a scene together and imagine a robot making its way through a deserted snowy street. We’ll use 3D Editor to work out the character performance, environment, composition, and camera movement, then continue in Canvas to develop the look of the shot using character and environment references.
There’s plenty of room to make this workflow your own. You can use 3D Editor and Canvas together, move between them at different points in the process, or use either one independently depending on what the shot calls for. Here, we’ll walk through one way they can work together, with practical tips you can carry into your own projects along the way.
Prefer to follow along on YouTube? Watch the tutorial:
How to create a 3D scene in Autodesk Flow Studio
Open 3D Editor from the Wonder Tools menu and create a new project. You can also access 3D Editor directly from the Create New Project button.
A new project begins with an empty scene. The viewport is your main working area, with characters, animations, cameras, and worlds available from the asset panel on the left. Along the bottom, the Timeline gives you control over character animation, camera movement, and other elements in your scene.
Across the top of the workspace, you can switch between projects, move between 3D Editor and Canvas, and access the Scene Outliner.
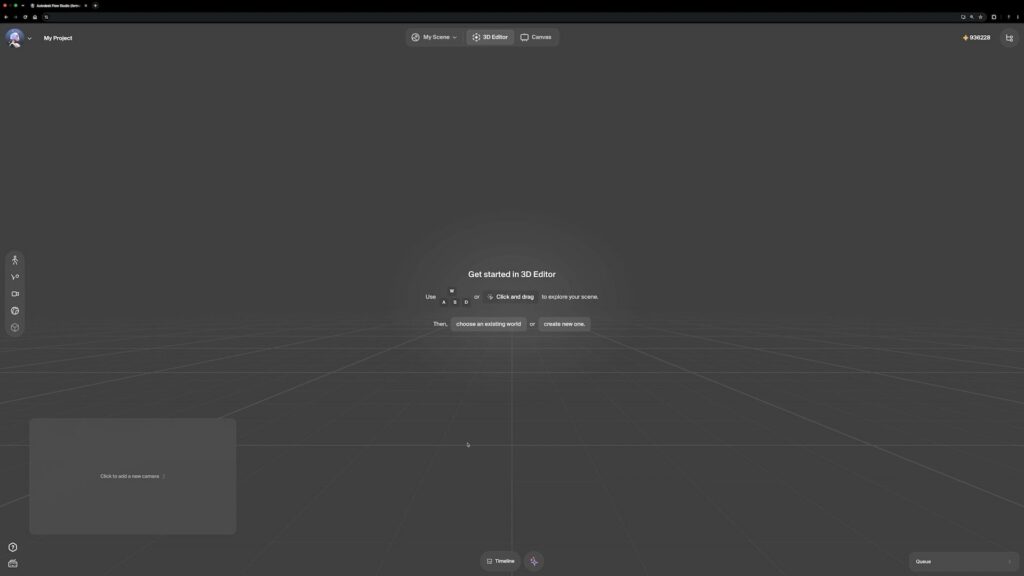
To navigate the viewport, use your W, A, S, and D keys to move through the scene and Q and E to move vertically. Hold the left mouse button to rotate, right mouse button to pan, or middle mouse button to move forward and backward.
How to add a 3D character to your scene
Open the Characters panel to choose who you want to add to the scene.
You can use Wonder Human, bring in a character you’ve already created with Wonder 3D, or create something new with Text to 3D or Image to 3D prompts.
We’ll start with Wonder Human as a stand-in. This gives us a character to work with while establishing the performance, scale, composition, and camera movement without committing to the character’s final appearance. Later, we’ll use reference images in Canvas to replace Wonder Human with the robot we want in the finished shot.
Select Add to Stage, position the character in the viewport with your curser, and click to place it.
If you already have a character you want to use, you can bring that in instead. Working with the final character from the beginning can also help when judging scale and framing.
How to animate a 3D character with AI Mocap
With a character in the scene, the next piece is movement.
3D Editor can use animations from the Explore library as well as animation from existing AI Mocap and Animation projects. Which option makes sense depends on what you need to capture from your source footage.
If your footage uses a static camera and you only need the performer’s movement, AI Mocap can extract the character animation. If you also need to capture the camera movement, use Animation instead.
Our source footage uses a static camera, so AI Mocap gives us what we need.
Select Static Camera Mocap and upload the footage. Scan the frame for actors, assign a character to the detected performer, such as Dummy Bot, and start processing.
Once the animation is ready, it appears in your library. Select Add to Stage, then choose the character that should receive the performance.
Expand the animation track in the Timeline to fine-tune the result. You can scrub through the performance, reposition it in time, or adjust its playback speed to better suit the shot.
How to create a 3D environment from a reference image
With a character and performance established, the empty stage can start becoming an actual place.
Open the Worlds panel to choose an existing environment or generate a new one. Worlds can be created from a text prompt, one or more reference images, a video, or even a panorama.
Our target setting is a snowy street, and we already have an image that establishes the environment we want.
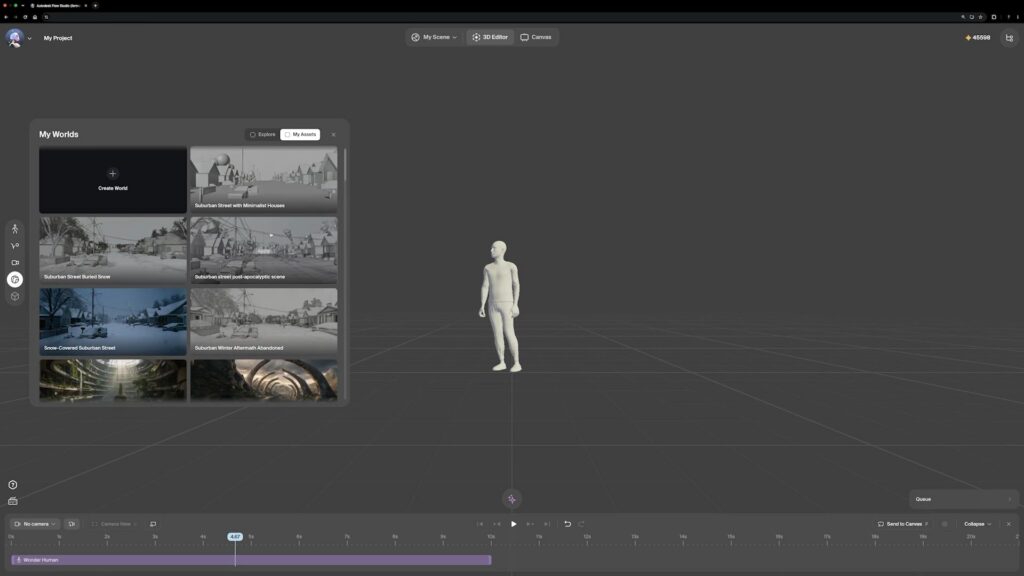
Rather than using the finished image directly, we’re going to create a simplified version first. This blockout gives us the structure we need for staging the scene in 3D, while the finished reference can come back into play when we refine the rendered shot.
To create that blockout, we’ll briefly move over to Canvas.
How to create an environment blockout with AI image generation in Canvas
Switch from 3D Editor to Canvas.
Canvas uses a node-based workspace where you can combine image and video generation with your own images, videos, renders, and assets from other projects.
If you don’t already have an environment reference, you can also create one here using one of the Nano Banana image models. An LLM can help you develop the image prompt as well.
Because we already have our snowy street reference, we can drag the image directly into the Canvas workspace.
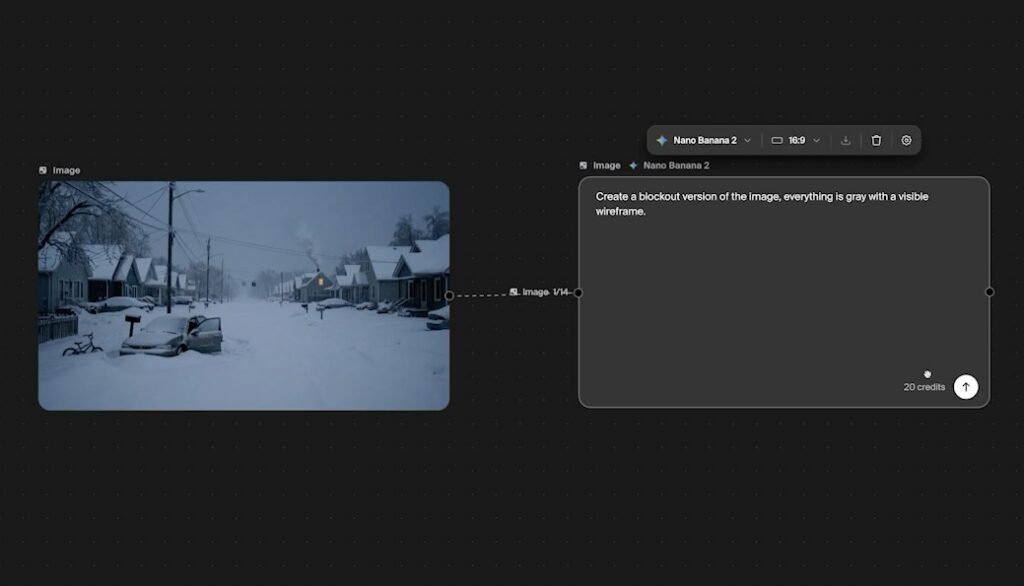
Create a Generate Image node and connect the reference image to it. This lets the node use the snowy street as a visual input while transforming it according to our prompt.
Enter: Create a blockout version of the image. Everything is gray with a visible wireframe.
Set the aspect ratio to 16:9, select Nano Banana 2 as the image model, and click Generate.
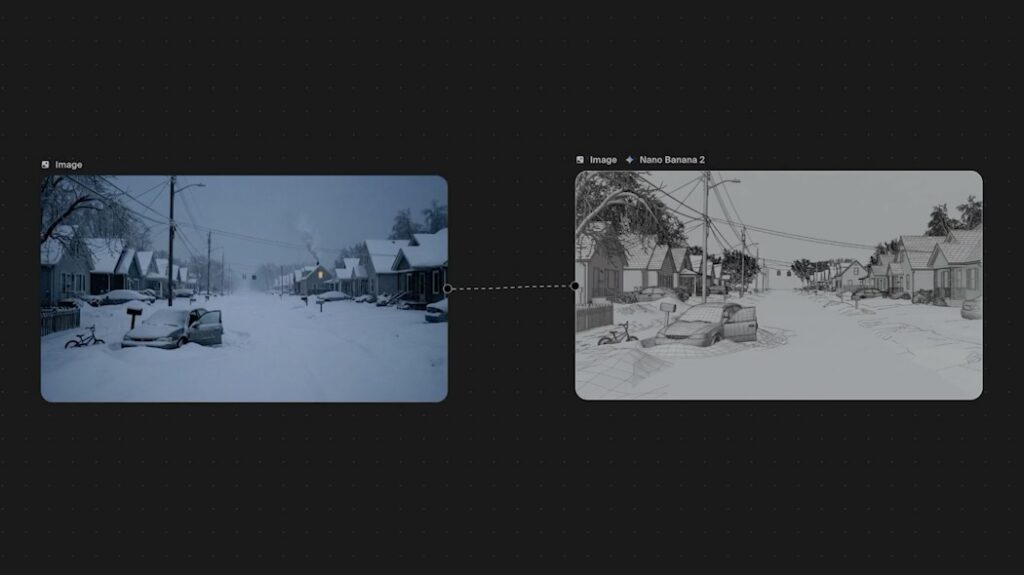
The generated image gives us a simplified representation of the environment while retaining the structure of the original reference.
Download the blockout, return to 3D Editor, and use the new image as the reference for generating the world.
How to position and scale your character in 3D Editor
Once the world is generated, you can place the character more precisely within the environment.
Select the character and use the transform controls to adjust their position, rotation, and scale:
- Press 1 to move horizontally
- Press 2 to move vertically
- Press 3 to rotate
- Press 4 to scale
Click to confirm your changes.
At this stage, the priority is how the character fits into the scene and composition. Their final appearance will come later when we return to Canvas.
How to create and animate a 3D camera
With the character, performance, and world in place, you can start shaping how the scene will be captured.
3D Editor lets you choose from preset cameras, reuse cameras from previous projects, or create your own movement with a Freeform Camera.
Preset camera animations can be either Global or Relative. Global cameras retain their existing animation when placed in the scene, giving you a starting point that you can adjust. Relative cameras are tied to the character, allowing the camera animation to follow their movement while maintaining its intended framing.
For this shot, we’ll create the camera movement ourselves with a Freeform Camera.
Open Cameras and add a Freeform Camera to the stage.
Enter or exit Camera View using the button in the Timeline or by pressing V. While in Camera View, you can also adjust the shot’s aspect ratio and Field of View (FOV).
Position the camera where you want the shot to begin, then press F to create the first keyframe.
After a keyframe is created, the playhead automatically advances by one second. Reposition the camera and press F again to create another keyframe. Continue adding positions to build out the camera movement.
You can refine the timing by selecting and dragging keyframes in the Timeline. To remove a keyframe, move the playhead over it and press C.
One timing detail is particularly important here: the duration of the camera animation determines the duration of the clip sent to Canvas. Anything before or after the camera animation on the Timeline is ignored when the clip is rendered.
How to send your 3D scene from 3D Editor to Canvas
Once the environment, character performance, composition, and camera movement are working together, the scene is ready to move into Canvas.
Before sending it over, choose the camera you want to render and set the output resolution and frame rate.
If you’re using a character other than Wonder Human, you can also enable Clay Render. This produces a simplified gray-shaded version of the character, which can help guide certain video generation models.
Select Send to Canvas.
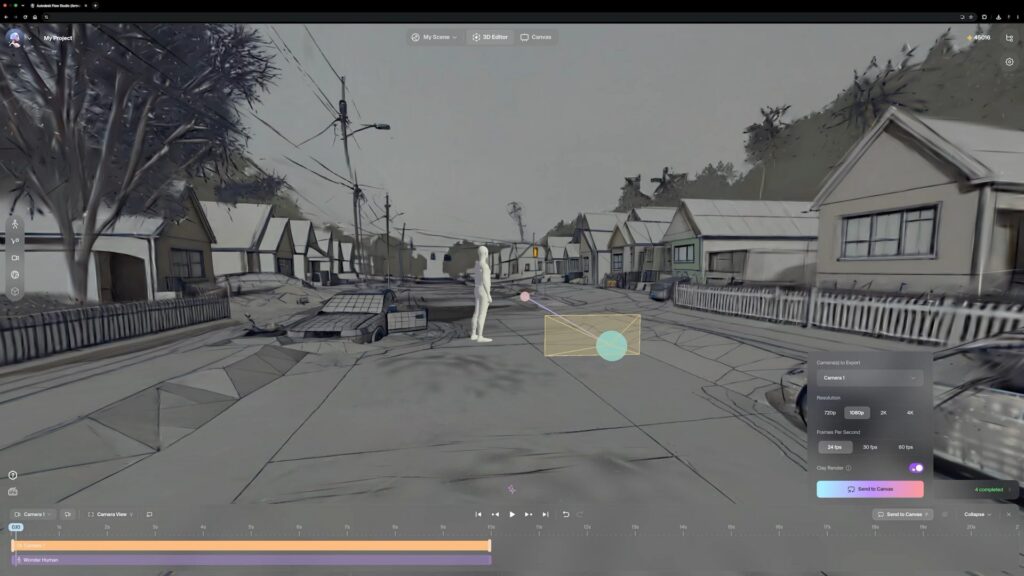
After processing is complete, the rendered videos from your scene will appear together in the Canvas workspace.
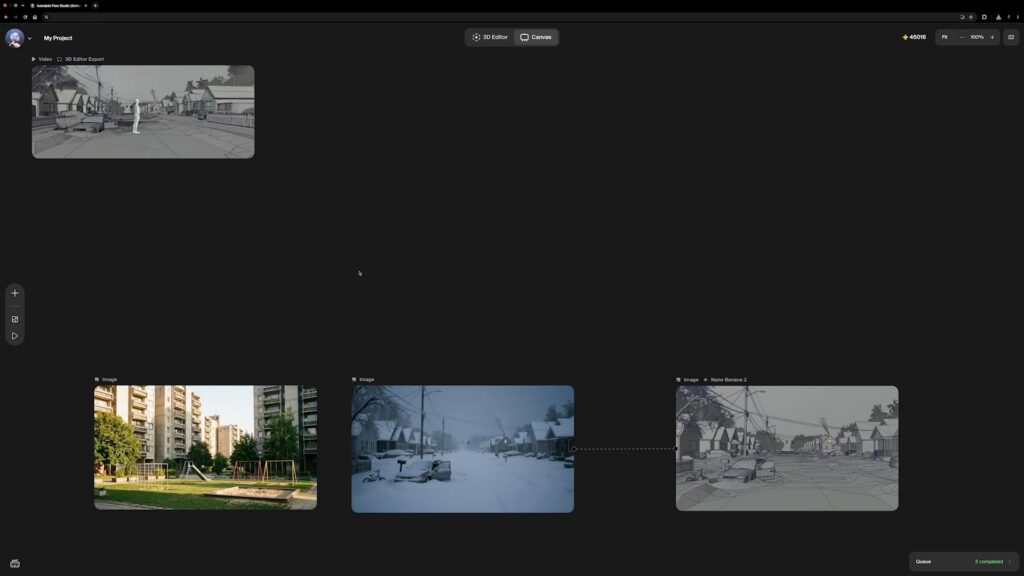
Depending on what you’re creating, 3D Editor and Canvas can also be used independently, with 3D Editor giving you more control and precision over your scene, composition, and camera movement, and Canvas giving you the speed and flexibility of a 2D workflow.
Here, we’re using both together: building and directing the scene in 3D Editor, then bringing that work into Canvas to continue refining the shot.
How to refine your 3D render with video generation models in Canvas
There isn’t one prescribed way to build in Canvas.
You could start with a generated image and use that image to drive a shot without creating a 3D reference at all. Because Canvas gives you an infinite workspace, you can also branch into different ideas, generations, and references as the visual direction of a project develops.
However, for our snowy street shot, the rendered scene from 3D Editor already gives us something useful: a reference containing the character performance, composition, and camera movement we established.
Create a Generate Video node and select Seedance 2.5 Reference as the video model.
Connect the rendered scene by dragging from its output pin to the video input on the Generate Video node.
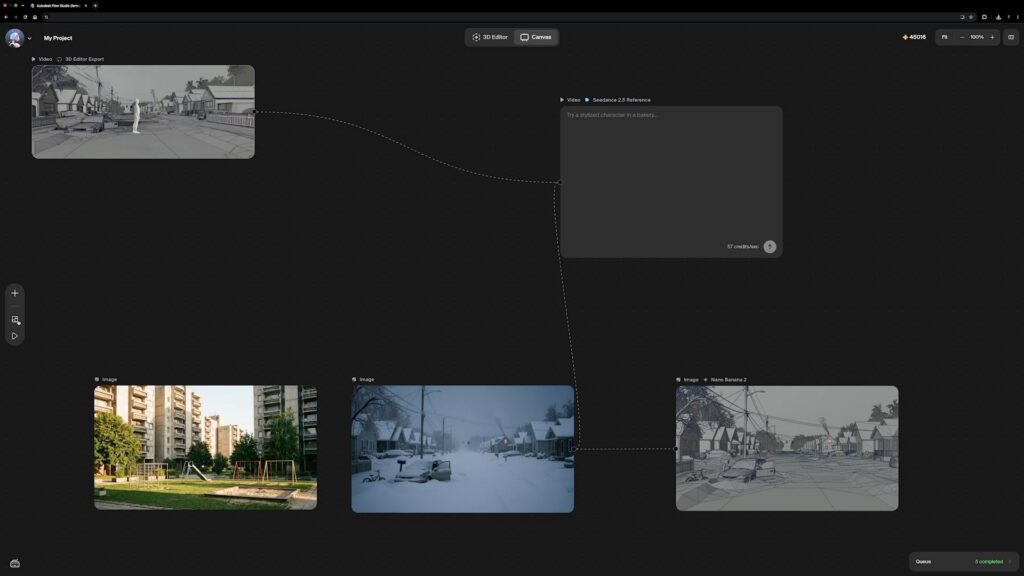
The 3D render can now act as a guide for the composition and animation as we continue developing the shot.
How to use character and environment reference images
The next step is to give the video model more information about how the finished scene should look.
Connect the original snowy street reference image to the Generate Video node. This provides the finished environment we want in place of the simplified version shown in the 3D render.
Then add the character references.
We used Wonder Human to establish the performance and staging in 3D Editor, but the finished shot will feature our robot character. Open the library and bring those reference images into Canvas.
Providing multiple reference images gives the model more visual information about how the character appears from different angles. Here, we’ll upload both a front and back view of the character.
If you only have a front view, you can also use a Generate Image node to create additional views before generating the video.
Connect both character references to the Generate Video node.
The Generate Video node now has the references we need: the 3D render for movement and composition, the environment reference for the snowy street, and two images of the robot character.
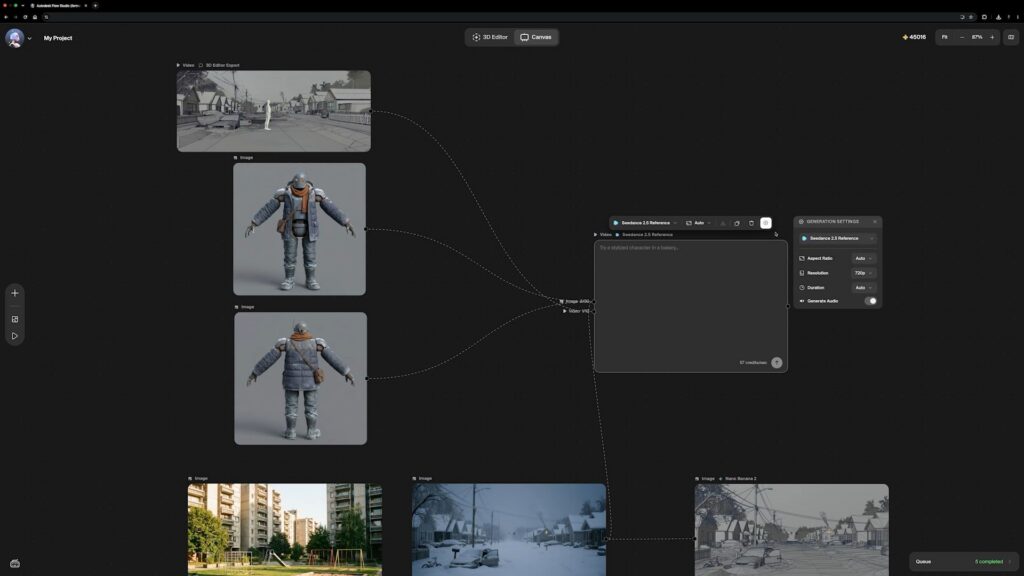
How to prompt a video model with multiple references
With the references connected, the prompt can tell the model what role each one should play.
Enter: Use @video1 as a composition and animation reference. Enhance the environment using @image1 and use @image2 and @image3 as a character reference. Framing must remain the same as in @video1.
Pay attention to the order in which references are connected to the Generate Video node. In this setup, the rendered scene was connected first, making it @video1. The snowy street environment is @image1, followed by the two robot references as @image2 and @image3.
Each reference has a different purpose. The rendered scene provides the composition and animation, the environment image establishes the finished world, and the character images define who should appear within it.
Adding “Framing must remain the same as in @video1” reinforces the camera composition already established in 3D Editor.
Select Generate to create the final shot.
Refining your scene
Once generation is complete, you can download the finished video or continue refining it in Canvas.
And this is only one version of the scene. Change the environment reference and the same camera move can take you somewhere completely different. Try another character, adjust the prompt, explore a different video model, or keep iterating on the look while holding onto the performance and composition you already created.
3D Editor and Canvas don’t always have to follow the same order either. You might begin by building and directing in 3D, start with an image in Canvas, or move between the two as your imagination takes shape.
Once you understand how the pieces can work together, you can start deciding which ones to keep fixed and which ones to push somewhere new. Take the workflow, make it your own, and see what kind of scene you build next.
Frequently asked questions about 3D Editor + Canvas in Autodesk Flow Studio
Flow Studio’s 3D Editor gives you direct control over characters, environments, animation, composition, and camera movement in 3D. Canvas provides a node-based 2D workspace where you can use image and video generation to continue refining the look of the shot. You can use them together or independently depending on your workflow.
Yes, you can use 3D Editor on its own to build and direct a scene, position characters and environments, work with animation, and create camera movement. Canvas is an additional workspace you can use when you want to continue developing or refining the shot with image, video, and audio generation.
Yes, you can start directly in Canvas with an image, video, or other reference and build from there. Using a render from 3D Editor is one way to give a video model guidance for composition, animation, and camera movement, but it is not required.
Static Camera mode is designed for footage captured with a fixed camera and a flat ground plane. It is useful when you want to capture a performer’s movement without needing to reconstruct camera motion. For footage with a moving camera, a different AI Motion Capture workflow may be more appropriate.
The duration of the camera animation determines the duration of the clip rendered and sent to Canvas. Anything on the Timeline before or after the camera animation is not included in that rendered clip.
Yes, you can connect multiple references to a Generate Video node and assign each one a different role in your prompt. For example, one reference can guide composition and animation, another can define the environment, and additional images can provide character appearance from different angles.